Showing posts with label wedding. Show all posts

Friday, February 23, 2024

Stampin' Up! Something Fancy Love Card

Happy Friday, peeps!

Love is definitely in the air with the last of my Kendra's Card Challenge #13 for February. This is sketch 15 and it's also my last "red" and "love" card for my team challenge...bet my teammates are happy about that...lol! However, I'm entering a fresh, new challenge at the Alphabet Challenge Blog. Caz chose to use X for Xtra Love/Hearts and I think this card fits the bill. 

For the inside...

So, I think this could be used for engagement or wedding, agree?

Thank you for stopping by today and I hope you have a great weekend ahead.

Project Details—All Products SU! Unless Otherwise Specified
Stamps Country Bouquet; Something Fancy
Card stock & Papers     Real Red; Basic White; Sending Love DSP (retired)
 Ink Real Red
Accessories Iridescent Pearls
Tools     Trimmer; Liquid Glue

Saturday, February 3, 2024

Stampin' Up! Love Card

Good morning, peeps! It's been quite awhile since I have made a card for a number of challenges. I will tell you about them after I show you what I created.


 I made this card for Kendra's Card Challenge #13 and followed her design for card #2. I also made it for my CNCK team and AIK team. CNCK's challenge is "love" or "Valentine's Day". AIK's challenge is "red". BUT my main goal was to also play with Tic Tac Toe Challenge #tttc240, for which the board was created by Vicky. Take a look see...


I went down the right side. The inside is blank as I'm not sure if I'll use it for a Valentine card, engagement card, wedding card or anniversary card. Those are a lot of options!

Thank you for stopping by today and I hope you have a great weekend.

Project Details—All Products SU! Unless Otherwise Specified
Stamps None
Card stock & Papers     Basic White; Real Red; Sending Love DSP Stack (retired)
 Ink None
Accessories Always Dies (retired); Darice Heart Background Embossing Folder;
Iridescent Pearls
Tools     Cut & Emboss Machine; Trimmer; Foam Adhesive Strips; Liquid Glue

Tuesday, August 8, 2023

Stampin' Up! Card Two Tone Flora Dies Wedding or Engagement Card


 Happy Tuesday, peeps!


I don't think this needs too much explanation, so while I'm on vacay, I'll just do the chart! Thanks for stopping by.

Project Details—All Products SU! Unless Otherwise Specified
Stamps Something Fancy
Card stock & Papers     Basic Black; Basic White
 Ink Light & Dark Flirty Flamingo; Light & Dark Lemon Lolly;Memento Tuxedo Black; retired Light Pale Papaya, Light & Dark Soft Succulent Blends 
Accessories Iridescent Pearl Basic Jewels
Tools     Two-Tone Flora Dies; Detailed Trio Punch (ret.)

Friday, June 9, 2023

Creative Creases Challenge #59 - Anything with a Fun Fold

Good morning, peeps. It's another every other Friday Fun Fold at Creative Creases and here's what I created for the challenge today..


Let's take a closer look at my fun fold, shall we?!

We made this card in our Thursday card group. Deb provided the card It's a CASE of Rachael Tessman Here you go!


  • Base cardstock (Night of Navy)5-1/2” x 11” scored parallel to short side at 4”, 5-3/4”, 7-1/2” and 9-1/4”
  • 3” x 6” scored parallel to short side at 3”
  • Basic White Cardstock (cut 3) 2-7/8” x 2-7/8” stamp with images and sentiments from the Crane of Fortune Stamp Set
  • Sun Prints Designer Series Paper (retired)(cut 3) 1-1/2” x 5-1/4” for the three panels
The ink we used is Crumb Cake and the dragonflies are stamped in Craft Ink.

I hope you have the time to enter our challenge. Just click on the logo or the blue "challenge" and you'll be transported there immediately. Debbie, Rae and I hope to see your entry over at Creative Creases #59.

Thank you for stopping by today and have a great weekend, be blessed and be a blessing

Thursday, March 30, 2023

Stampin' Up! Happiness Abounds for the Happy Inkin' Thursday Blog Hop

Here is what I created for our hop today...


Let's take a closer look at my card again...

Those of you who are familiar with Stampin' Up! will recognize the Brick & Mortar 3D Embossing Folder I used on the Daffodil Delight Cardstock. 

I adhered a panel of Hues of Happiness Designer Series Paper to it. I used the Blossoming Happiness Dies to cut the big flower and leaves and adhered the flower to the front with Stampin' Dimensionals, slipping the leaves underneath with liquid glue.

I stamped the sentiment in Melon Mambo on a scrap piece of Basic White and cut it out, along with a scrap of Hues of Happiness, with a die from Something Fancy. I adhered them together and to the front with liquid glue.

Five Glossy Dots Assortment embellished the front.

For the inside...


another cut flower from Hues of Happiness DSP and sentiment from Happiness Abounds stamped in Melon Mambo.

Clicking on the "next" button will take you to Akiko. Clicking on the names listed below will take you directly to team members and their projects. I hope you enjoy all the creativity. Thank you for stopping by!


Amy Koenders
Mary Deatherage
Kristi Gray
Jaimie Babarczy

Monday, October 31, 2022

Stampin' Up! Magnolia Lane Memories & More Matrimony Card

Welcome to my Monday Morning M & M's Madness! Did you see all those M's? Ready to see why?

Magnolia Lane Memories & More Card Pack


Magnolia Lane Large Specialty Memories & More Kraft Cards and Envelopes


Matrimonial Message...


Everything is retired...sorry...but I had fun using it for the first time! 

I'm entering my card at Pammie's Inky Pinkies Challenge 2244 - Theme is Celebration. What better way than a wedding!

Thanks for stopping by and help yourself to some M & M's!!


Monday, July 11, 2022

Stampin' Up! Hues of Happiness Wedding or Birthday Note Card

If this is your first time visiting, welcome to my Monday Morning Makeover Madness! I hope you have the time to click on the follow button and subscribe to receive email when I post. (For those who have already done that, I have a new subscribe button/service as some people were not receiving.)

Today I have another card we made in our Thursday card group. It's a CASE of the Stampin' Up! Annual Catalog 2022-2023 cover. I was inspired by Mandy VanHavermaet. 


The card base measures 4" x 5 1/2" and I cut a piece of Hues of Happiness DSP to the same size. I adhered it to the card front with liquid glue.

The Basic White panel is 3" x 4 1/2" and the edge is die cut with a die from the Blossoming Happiness Dies. The flowers and leaves are cut out with dies from that set using the Hues of Happiness paper. I also stamped some leaves from the Happiness Abounds Stamp Set. I adhered the flowers with Stampin' Dimensionals and the leaves with liquid glue. 

The sentiment from Happiness Abounds is stamped on a scrap of Basic White with Melon Mambo ink. I "bannerized" the end and adhered it with Dimensionals. I added embellishments from the Glossy Dots Assortment. They come in three different sizes and I really like that!

The inside is simply stamped with "Thinking of you on your special day" from the Inspired Thoughts Stamp Set and an adhered strip of 4" x 1/2" DSP at the bottom.

I think you could use this card either for a wedding or birthday. Your thoughts?


Thank you for stopping by today. I hope you'll return tomorrow for our monthly Amy's Inkin' Krew Blog Hop.

Tuesday, June 28, 2022

Stampin' Up! Splendid Thoughts

Back on June 18, Stampin' Up! held a "Creativity Now" virtual event and we were able to make four cards (I tweaked mine!) with the Splendid Thoughts Bundle. It will be available to customers July 1 in the July/December 2022 Mini Catalog. I hope you like my cards and the Splendid Thoughts Bundle.


If you would like instructions on how I created each card, along with the insides (not shown in this post), let me know in an email or comment with instructions on how to send them to you.

Thank you for stopping by today and I hope you'll return on Thursday for our Happy Inkin' blog hop.


Monday, June 20, 2022

Stampin' Up! Splendid Thoughts Many Occasion Card

Welcome to my Monday Morning Makeover Madness card. This one is a makeover of my teammate, Tara Carpenter, from Missouri. She demonstrated her card at our quarterly Inkin' Krew Zoom meeting last week and you can see it here. We used the Splendid Thoughts Bundle, which will be available to customers July 1. In case you haven't heard, Stampin' Up! is having free shipping tomorrow only so I'm getting my list together. If you'd like to place an order through me as your demonstrator, just click on the tab on the right side bar. Back to the card after that psa!

Here is how mine turned out...

We started by putting 2 strips of Post-It Tape on a panel of Shimmery White cardstock leaving about 1 3/4″ opening between them. Starting with Pale Papaya Ink, using my Blending Brush, I added color to the top section of the panel. I then added Soft Succulent Ink using my Blending Brush in the center section. Lastly, I blended Orchid Oasis Ink on the bottom section.

I stamped the sentiment from the Stampin’ Up! Splendid Thoughts Cling Stamp Set in Evening Evergreen Ink on the bottom of the panel. There was a smudge of ink on the panel so I stamped the leaf image in Soft Succulent ink, missed the smudge so I covered it using Soft Succulent ink and my waterpainter for the "swishes". I cut the leaf from a panel of Soft Succulent cardstock. using my Splendid Stems Dies  I adhered the leaf die to the card front using liquid glue. I wrapped a piece of Soft Succulent 3/8" Open Weave ribbon around the Shimmery White panel, tied a bow and adhered the panel to a Soft Succulent mat using Stampin’ Seal. 

I adhered the layered panel to an Evening Evergreen card base using Stampin’ Dimensionals. I added three Iridescent Rhinestone Basic Jewels to the card front.

On the inside I stamped the sentiment from the Stampin’ Up! Charming Sentiments Photopolymer Stamp Set in Soft Succulent Ink on a Basic White panel. I punched the corners with the retired Detailed Trio Punch and adhered the panel to a Soft Succulent mat and then to the inside of the Evening Evergreen card base.


I'm entering my card at Pammie's Inky Pinkies Challenge #2225, Crafty Gals Corner #232 - ATG,  and Path of Positivity Challenge #102 Anything Goes Positive. This site is new to me. They have an optional twist, but I'm not doing that. 

Thank you for stopping by today and here's the only green M & M I could find that wasn't controversial! To me, M & M's are just chocolate...I had not heard the big hullaballoo over it until today.

"He makes me lie down in green pastures; He leads me beside quiet waters."

Psalm 23:2


Friday, January 28, 2022

Stampin' Up! Last a Lifetime Wedding Card

Today I created my card with the foiling technique. I hadn't done it in awhile and I came across my supplies when I was searching for some missing items.

I’m using the Unity  Butterfly Fly Away Toner Card Fronts and Gold Shattered Glass Deco Foil. I used Stampin' Up! Last a Lifetime Stamp Set for the sentiments.

The Toner Card Fronts are perfect for easy cards. I blended on some color with Tim Holtz Distress Oxide inks and then did the foiling. I love that the butterfly toner images are printed on cardstock. You can do so much with them to make your cards sparkle and shine. I was disappointed after I completed the process that my sponging didn't show like it did before the foiling process. I need to search out some videos to show me how to do this properly. Plus the foil is flaking off. Perhaps I am missing a step or there is another reason. BUT, don't you love how it sparkles?

I cut a gold foil frame with one of my Stitched Rectangles Dies. I used my trimmer to cut the toner card front. I used the Ornate Frames Dies to cut out my sentiment and adhered it with Stampin' Dimensionals. My card base is Basic Black cardstock. It has enough glimmer to it so I didn't think I needed to add any embellishments.

The inside is simple...

I adhered a gold mat for my Very Vanilla sentiment panel. I punched the corners with my Detailed Trio Punch. I stamped the sentiment in Memento Tuxedo Black Ink but it just looked too "blah". So, I ran the panel through my embossing machine with the Tasteful Textile 3D Embossing Folder. I'm now wondering how it will be trying to write on it when the time comes. Probably a felt-tip writer will work the best. If you have any ideas, let me know.


Thanks for stopping by today and I hope you are heading into a great weekend. If you are living in the northeast, may the blizzard be kind to you.

Thursday, January 6, 2022

Stampin' Up! Fresh Hello for the Happy Inkin' Thursday Blog Hop


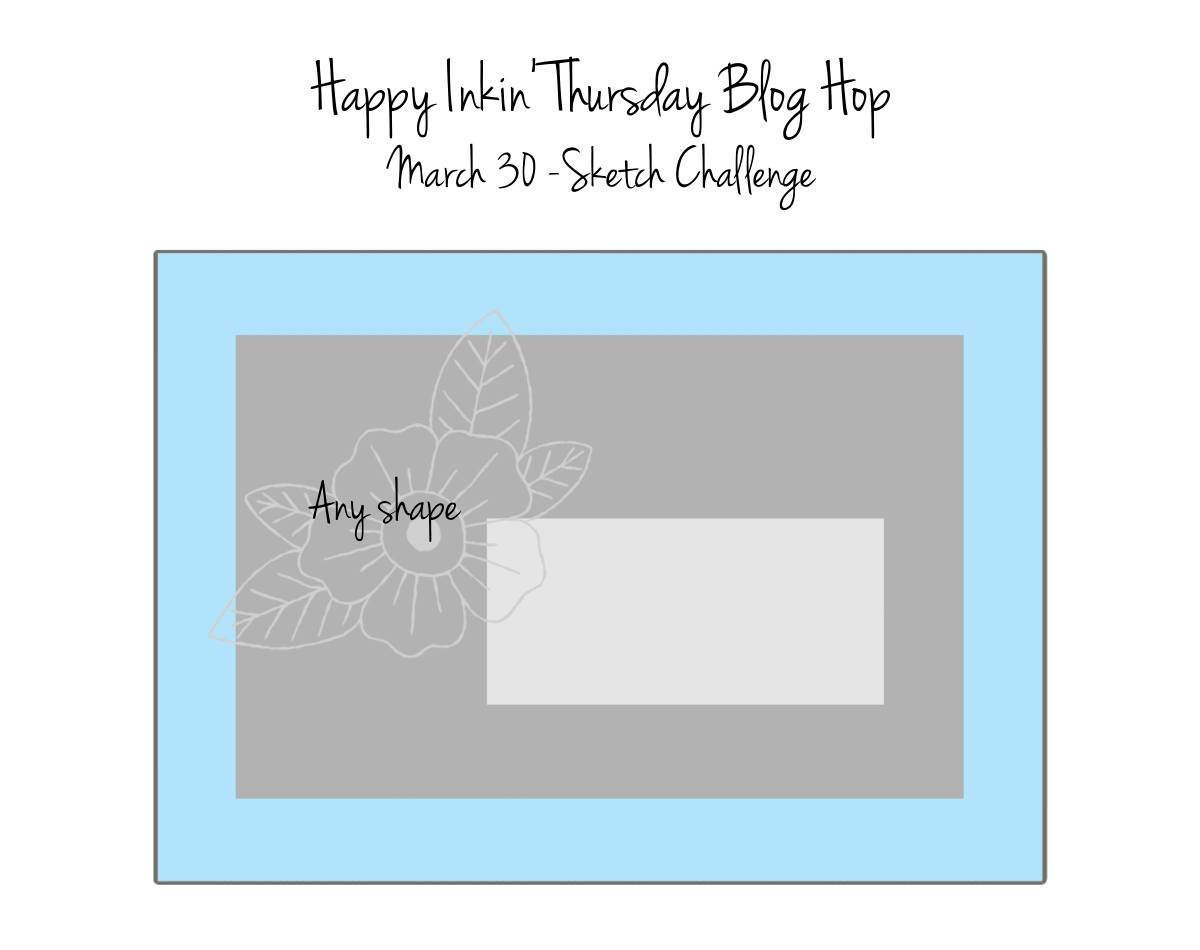
Welcome to another HITBH! If you came from Sue Prather's site, I'm glad you are continuing the hop. If you haven't then I hope you'll continue to hop using my links below. No matter what, I'm glad you're here. Today we have a sketch challenge and here is what I created for it...

and here is our sketch...
I was inspired by two of the colors at The Card Concept Challenge #166...Black and Pale Papaya. I consider my card CAS.

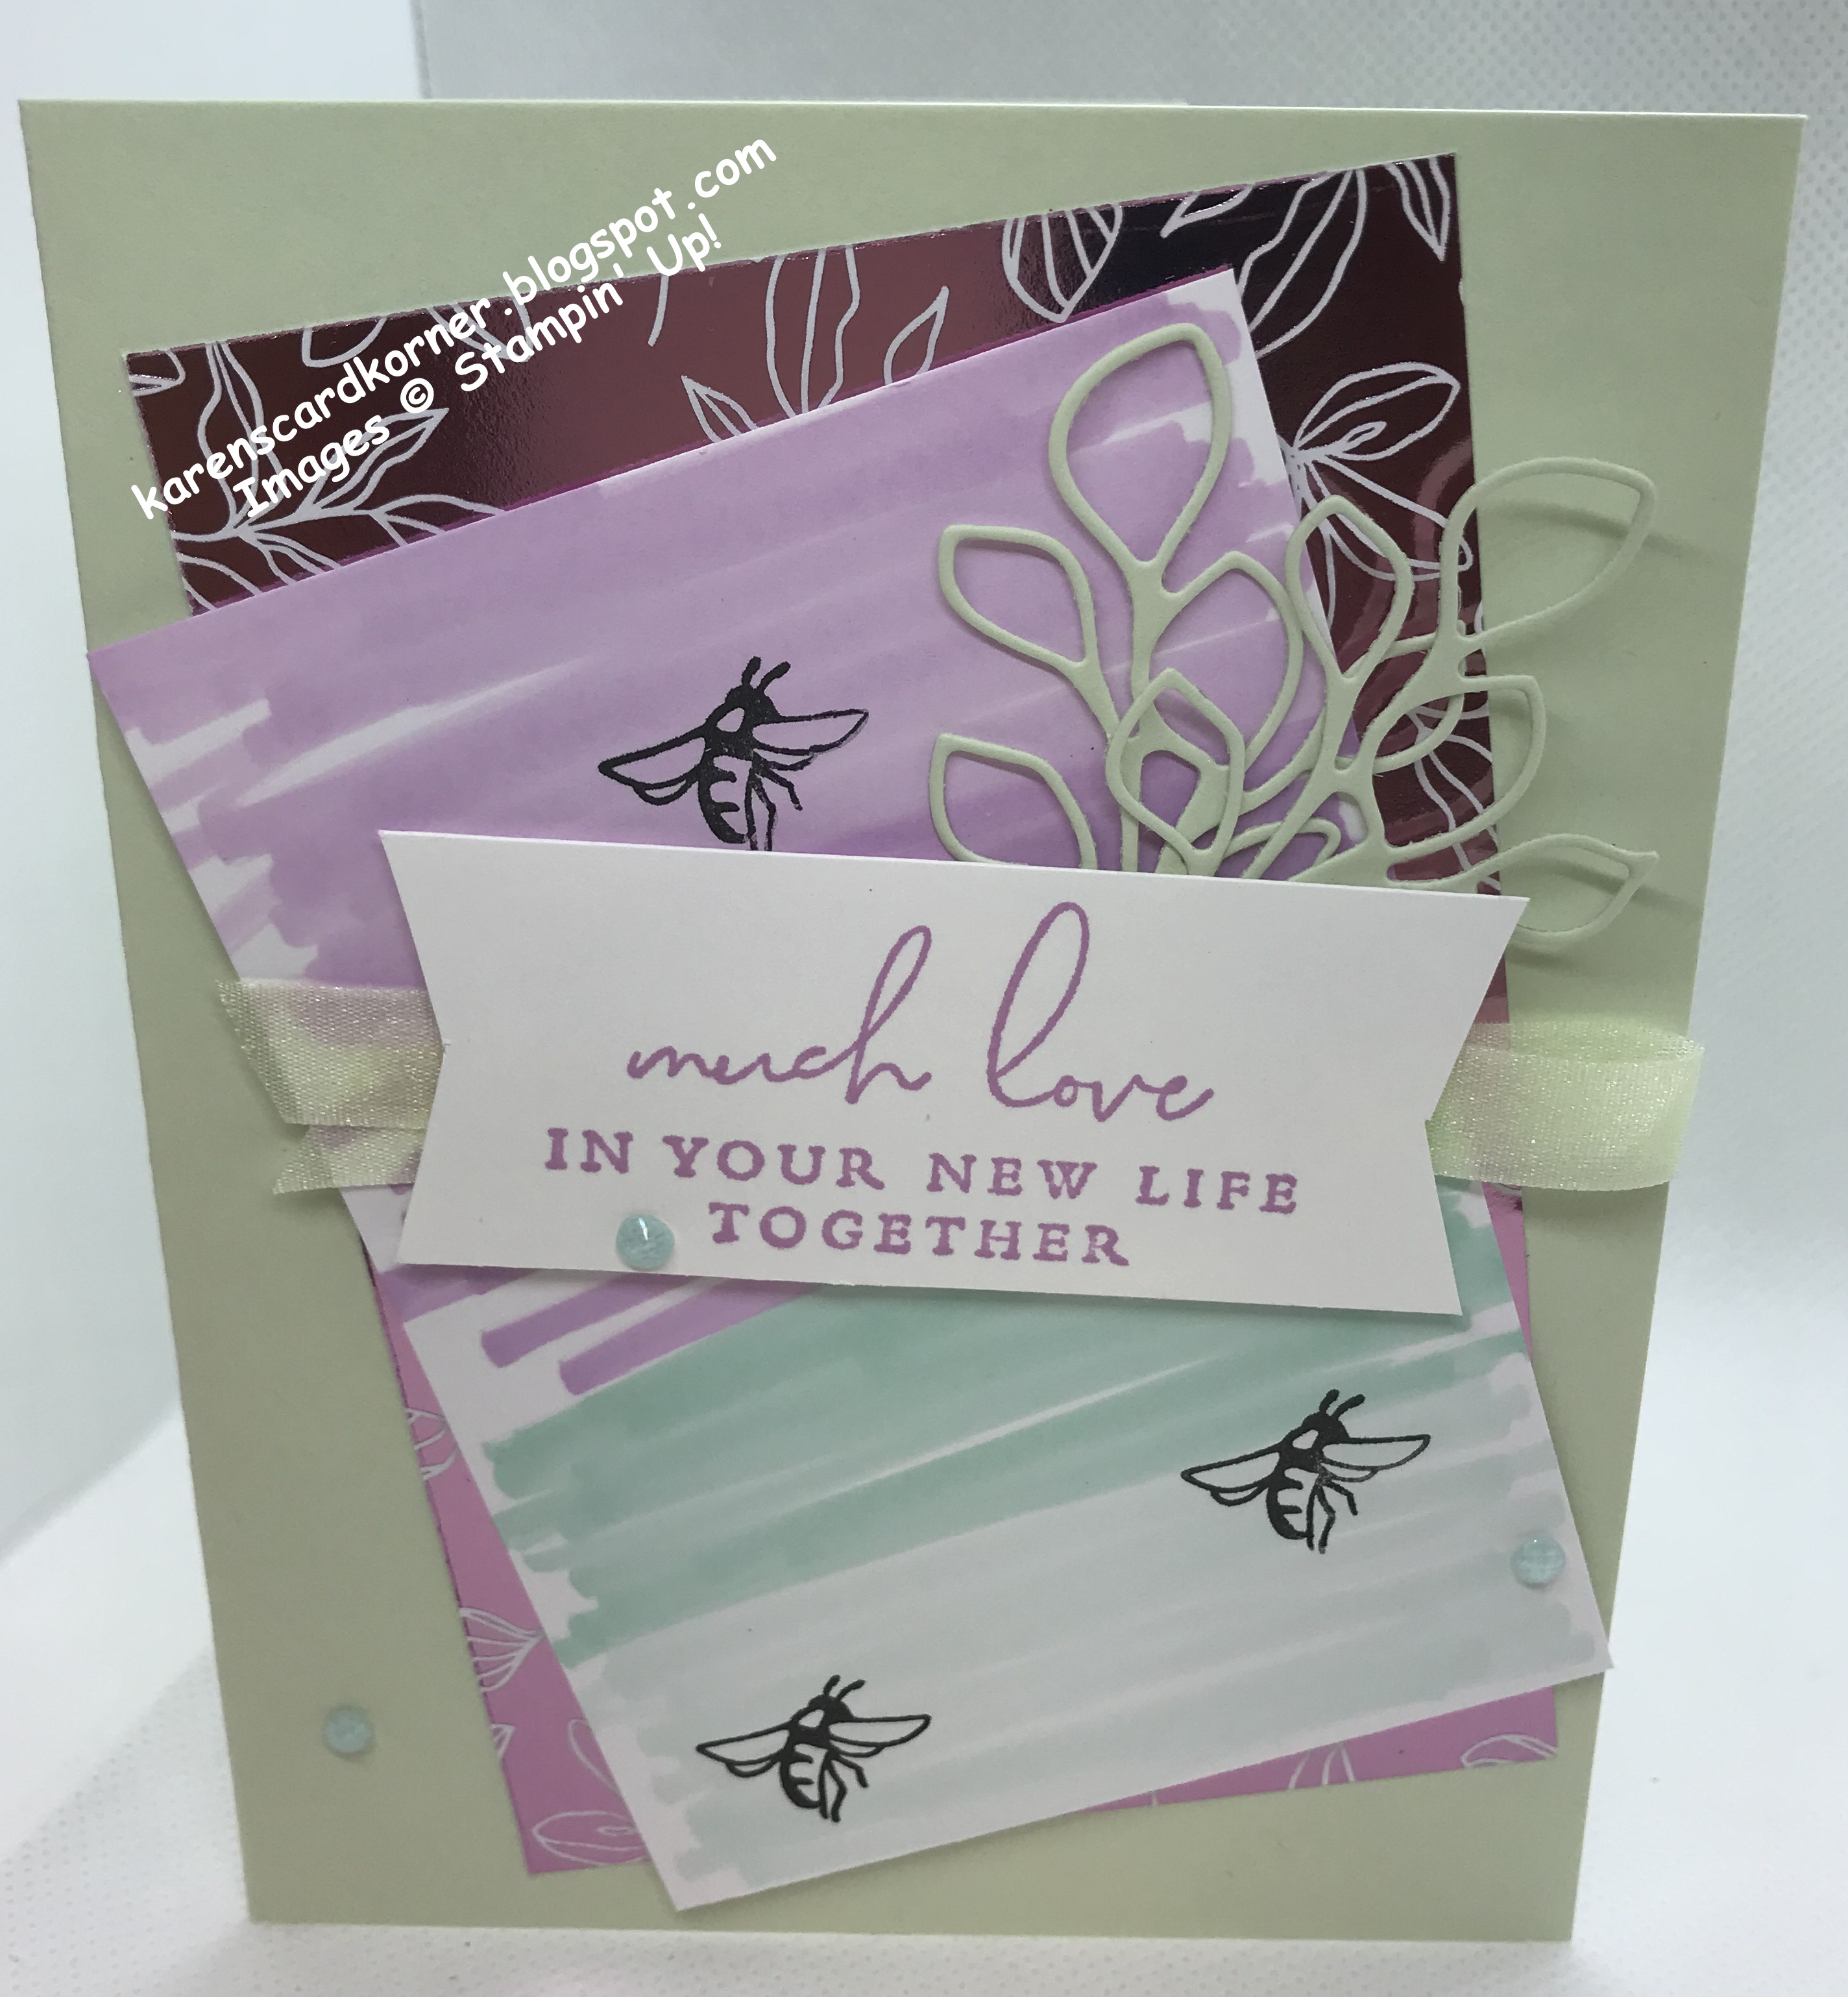
My card base is thick Basic White (5 1/2" x 8 1/2", scored and folded at 4 1/4"). I cut a piece of Basic Black cardstock with the second from largest Stitched Rectangles Die using the Stampin' Cut & Emboss machine. I adhered the rectangle to the card front with liquid glue.

I was inspired by Gez Carpenter to semi-create my own background. So, I took a pattern from the new Fresh Hello DSP and stamped images on it from the new Fresh Hello Stamp Set. I then cut a piece with the fourth from largest die from the Stitched Rectangles.

The sentiment is from the new Crane of Fortune Stamp Set. The stamp reads "Wishing a lifetime of Happiness and a World full of Love" but I only wanted a teeny tiny sentiment on the front so that I didn't cover up my stamping on the DSP too much. Therefore, I taped off the words except for "wishing a lifetime" and inked it up with Memento Tuxedo Black ink. Then I removed the tape and stamped on a scrap of Basic White. I cut the sentiment out with a die from the Ornate Frames Dies. I sponged around the edge with the black ink and adhered it to the DSP with mini Dimensionals. I adhered the art panel to the black mat with liquid glue.

For the inside, I taped off the "Wishing a lifetime" and inked the remainder of the sentiment. Once again, I removed the tape and stamped directly on the inside of the base. I added three black Classic Matte Dots and stamped the leafy image from the Fresh Hello set.


I cut a 1/4" strip of the DSP and adhered it to the bottom. It was really fun creating this and I'm entering it also at Mod Squad Handmade Background/Focal, NBUS #34 as this is the first time I have used the new products, at Double Trouble #100 Challenge but I'm only playing with Thing 1 and Thing 2 and at Bitten By the Bug 2.

In Summary: 1. Create at least two or more layers.
2. Use at least one die.


Thing 2: Double Dare
says, "Bitten by the Bug 2 is a challenge that usually requires the inclusion of a cut item from a Cricut machine, however, we CUT a Die'al with them. For this challenge only, our partner is accepting the use of cut items from punches, dies, and any cutting machine, but NO fussy-cutting! Enter the Bitten by The Bug 2 Challenge for an extra chance in our usual random draw prize."

Clicking on the "next" button will take you to Akiko. Clicking on the names listed below will take you directly to team members and their projects. Thank you for stopping by and hopping with us!

Amy Koenders
Mary Deatherage
Jaimie Babarczy
Sue Prather
Karen Finkle - you are here!
Akiko Sudano
Karen Ksenzakovic
Tara Carpenter
Terry Lynn Bright

Sunday, October 31, 2021

Stampin' Up! Wedding Card

Good Sunday morning, peeps. I'm behind the eight ball once again. I would have finished my card on time if I hadn't been careless along the way! I wanted one more wedding card for the Craft Fair coming up Saturday so I created this. My inspiration was from the Let's Squash It Double Embossing Challenge #13.

I dug out the retired Last a Lifetime Stamp Set for the sentiments. For my double embossing, I used the Brick & Mortar 3D EF and the Dandelions 3D EF. This is the first time I've used the Dandelions folder so I'm playing at NBUS #31. I'm also playing Tic Tac Toe at The Paper Players PP565, going across the bottom row.
Now, I'm ready to show you my card!

I sponged the edges of my 4 1/8" x 5 3/8" piece of Basic White that I had embossed with the above-mentioned folders. I had stamped the sentiment with VersaMark Ink and heat embossed it with Gold Embossing Powder. Triple embossing!!

For the inside...

The Gold Foil frame is from the Scalloped Contours Dies. The flowery doo dads strip is from the Ornate Layers Dies. I used the two hearts from that piece as embellishments, along with a gold Metallic Pearl. The Basic White panel measures 3 1/4" x 4 5/8". I used retired Gold ink to stamp the sentiments.

Thank you for stopping by today and have a blessed one! See you tomorrow for M & M's!


Stampin' Up! Beautiful Gallery Thinking of You Fun Fold Friday

Yay, it's Friday...a fun fold Friday at that! Here's what I created for today. My design came from Mystery Stamping night with Dani...