Thursday, April 29, 2021

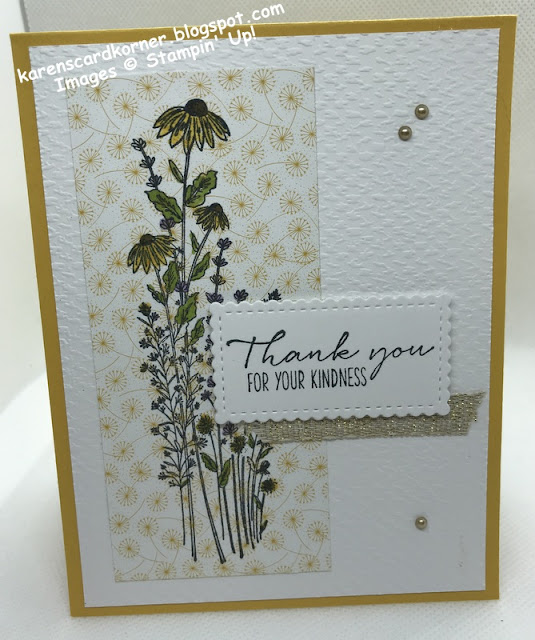
Stampin' Up! Dragonfly Garden Thank You Card

Welcome to the Happy Inkin' Thursday Blog Hop. This week we have a sketch challenge. If this is your first time here, welcome! If not, welcome back!!

I used the Dragonfly Garden Stamp Set to create my card today.


Here is our sketch...


My card base is Crushed Curry with a Tasteful Textile 3D embossed mat of Basic White. 

I cut a piece of Dandy Garden Designer Series Paper and stamped the flower stamp from Dragonfly Garden in Memento Tuxedo Black ink. I colored the flowers using these Stampin' Blends:
  • Dark Daffodil Delight
  • Dark Granny Apple Green
  • Light Highland Heather
  • Dark Soft Suede
I adhered the image piece to the mat with liquid glue. Then I stamped the sentiment from Dragonfly Garden on a piece of Basic White cardstock and cut it out with the second smallest die from Stitched So Sweetly Dies. I put Stampin' Dimensionals on the back and adhered it over a piece of Fine Art Ribbon, which I had glued down with Stampin' Seal.

Three Metallic Pearls finished the front of the card. Easy peasy!

Now, on with the hop! Clicking on the "next" button will take you to Akiko. Clicking on the names listed below will take you directly to team members and their projects. Thank you for stopping by today and hopping with us.


Amy Koenders

MaryDeatherage

Kristi Gray

JaimieBabarczy

Sue Prather

Karen Finkle – you are here!

Akiko Sudano

KarenKsenzakovic

Measurements:

Card Base: 4 1/4" x 11", scored and folded at 5 1/2"

Embossed Mat: 4" x 5 1/4"

DSP: 2 1/8" x 4 3/4"

Sentiment: 2 1/2" x 1 1/2"

Ribbon: 2 1/2"

Partial Product List

Links by TheseAreMyStamps.com

Wednesday, April 28, 2021

Stampin' Up! Happy Thoughts Thinking of You

Good mid-week, peeps. Today my card is inspired by three challenges, which I will list at the bottom of my post. I used Stampin' Up! Happy Thoughts Stamp Set and Unity's Daisy Girl Stamp Set to create my card.


I used my Blending Brushes to create three colors on a Basic White mat.
  • Mint Macaron
  • So Saffron
  • Blushing Bride
Then I ran the mat through my embossing machine using the Ornate Floral 3D EF.  Unfortunately, the camera doesn't pick up the EF's for the banners...Tasteful Textile 3D and Subtle (retiring soon). I adhered it to a Soft Sea Foam card base.

I used two squares from the Stitched Shapes Dies (sold out) to cut out Blushing Bride and Mint Macaron squares. The sentiment is stamped in Mint Macaron using the Happy Thoughts Stamp Set. The image is stamped in Memento Tuxedo Black ink using a stamp from the Daisy Girl set by Unity.

The "bling" is from the upcoming Genial Gems (available 5/4/21).

The Spot Challenge #159 - Ink Blending

Cupcake Inspirations #517 - Use Pastels


Let's Squash It Challenge #7 - Three Folders and a Person


I thank you all for visiting and if you have any questions, ask away!

Partial Product List

Links by TheseAreMyStamps.com

Tuesday, April 27, 2021

Christmas is only 242 Days Away!

Good Tuesday morning, peeps. My card today is brought to you by Hero Art stamps (circa 1999!). This is the last of the cards we made at our stamp club last Thursday hosted by Sue M.


We used a technique none of us had ever done...stamping on velvet! You need real velvet for it. Here are the basics:

1. Only use a red rubber stamp with detail.

2. Use a dry iron pre-heated to high (rayon/wool/cotton setting).

3. Cut a piece of square velvet a little larger than your stamp. Place it nap side down on the rubber.

4. Spray the back of the fabric so it is quite damp but not soaked.

5. Place the iron on the fabric and press for about 25 seconds. If your stamp is large, move the iron by lifting it and press again. Don't slide it, you'll end up with a blurred image!

6. Lift to see if the image shows, if not continue pressing. Your image will show faintly on the back of the velvet.

7. Remove fabric, turn right side up...et voila!

8.  Adhere a piece of two-sided adhesive sheet to the back of the fabric.

9. Cut out with a die of your choice. Sue chose an oval.

10. Remove remaining adhesive backing and adhere to card front.

I hope this all makes sense and that you will try it. There are a number of You Tube videos but I didn't see any that were as simple as Sue's method.

I'm entering my card at:

Christmas Card Throwdown: April Technique Challenge

Craftyhazelnut's Christmas Challenge 539

Thank you for stopping by today and I hope your week will go smoothly.


Monday, April 26, 2021

Stampin' Up! Campology

 Good Monday Morning Makeover, peeps! Remember yesterday the card I showed you? Yes or no, you can see it here.

Today I used the Campology Stamp Set and printed out another favorite Bible verse. I think this could be a masculine card, don't you? Thus, I'm playing at International Art & Soul Ch#107 A Card or Gift for a Man.


My card base is Night of Navy with a mat of Daffodil Delight. I sponged a piece of Basic White with Night of Navy, Misty Moonlight, Balmy Blue, Daffodil Delight and Crushed Curry inks. I cut out the computerized sentiment with a Stitched So Sweetly Die and sponged it so the white wouldn't be so bold. I added three Playful Patterns Resin Dots. I colored in the lantern light with my Dark Mango Melody Stampin' Blends. I'm hoping to turn this into an encouragement card.

I'm entering my card at Happy Little Stampers Anything Goes with Dies April Challenge and Pammie's Inky Pinkies ATG 2117.

Thank you for stopping by today.

Sunday, April 25, 2021

Stampin' Up! Blending Brushes and Stampin' Blends

 This is the third card we made at our Thursday stamp club. I will do a CASE of it by using a Stampin' Up! stamp set soon. However, I think this is a wonderful stamp set by Inky Antics.


We colored the image panel using Stampin' Up! Blending Brushes, Balmy Blue ink pad, and So Saffron ink pad. The sentiment is stamped in Night of Navy ink. Don't forget to put the mask for the sun on before you start sponging! The inside of the lantern is colored with So Saffron Stampin' Blends.


Thank you for stopping by today and I hope you are having a beautiful Sunday.


Saturday, April 24, 2021

Stampin' Up! Not today!

My card today is just plain cute and we made it at our stamp club Thursday! This was such a fun card to make. 


The technique we used was a Distress Oxide smooshing one and the stamp set can be found hereThe musical note dies can be found here.

I'm entering my card in the Alphabet Challenge - B is for Bird and at Sunday Stamps 255 Spring Blooms. I used Fossilized Amber, Cracked Pistachio and Mermaid Lagoon colors (yellow, green and blue).

Thank you for stopping by today and if you have any questions, I'll be happy to answer as long as you leave a comment with your email address...or send me an email!


Friday, April 23, 2021

Stampin' Up! Timeless Tulips Birthday Card

 TGIF! Hope you are heading for a fabulous weekend! It's spring, right? and spring brings tulips so that is what I'm bringing you today. This is a card we made yesterday at our stamp club. I haven't used the Timeless Tulips Stamp Set in awhile and I am happy that is carrying over.


The card base is Rose Red (retired) but you could use Poppy Parade, Melon Mambo or any color you want!  The tulips are stamped in Rose Red, Daffodil Delight and the stems are Old Olive. Sue M., our hostess, had an Old Olive stamp pad that I had never seen before, have you?

The largest tulip is Rose Red, stamped off once and then the bottom is sponged with Daffodil Delight, stamped again on scrap Basic White and punched with the Tulip Builder Punch. Two of the leaves were punched also. 

The bee is from ek success. You can find these on Amazon.
The inside stamp is from Birthday Blooms (retired).


It's Aud Sentiments 11th birthday so this is for them! Happy Birthday, Design Team.

Thank you for stopping by today.


Thursday, April 22, 2021

Stampin' Up! Positive Thoughts for the Happy Inkin' Thursday Blog Hop


Welcome to the Happy Inkin' Thursday Blog Hop. This week we have a theme challenge. If this is your first time here, welcome! If not, welcome back!!

I used the Positive Thoughts Stamp Set to create my card and can you guess what our theme is?


My card base is Basic Black. I stamped a mat of Basic White with the upcoming Soft Succulent Ink using the leaf stamp from Positive Thoughts (first and second generation). 

I cut a piece of Soft Succulent cardstock and ran it through my embossing machine with one of the Greenery Embossing Folders and adhered it to the leafy mat with liquid glue, then adhered that to the card base.

Using Memento Tuxedo Black ink, I stamped the butterfly from Positive Thoughts on a scrap of Basic White and punched it out with the Rectangular Postage Stamp Punch. I sponged the edges unevenly to bring more attention to the butterfly. Did it work?

For the sentiment, I used a stamp from Vine Designs (retiring in June), sponged it and punched it with the Lovely Labels Punch. I adhered that to the embossed panel with liquid glue and adhered the butterfly with Stampin' Dimensionals. I added one Soft Succulent Genial Gem (available May 4) and the card front was done.

On the inside, I stamped the leaves second generation, and a sentiment from Timeless Tulips. I think I achieved a heart shaped look. Do you think so? This is the second sympathy card I needed this week unfortunately.


Now, on with the hop! Clicking on the "next" button will take you to Akiko. Clicking on the names listed below will take you directly to team members and their projects. Thank you for stopping by today and hopping with us.

Amy Koenders

MaryDeatherage

Kristi Gray

Jaimie Babarczy

Sue Prather

Karen Finkle – you are here!

Akiko Sudano

Karen Ksenzakovic


Wednesday, April 21, 2021

Stampin' Up! Forever Blossoms Mother's Day Card

Good morning, peeps. Yeppers, we have reached mid-week already. Time flies when you're making cards and here's one I made for you today! I thank Ann Schach for her inspiration.

My card base is Basic White with a mat of DSP from the True Love Series. Another pattern is adhered to that. Then I matted the same striped pattern on a Basic Black mat and adhered it to the card front. 

I stamped the image on a piece of Basic White and die cut it. Then I colored it with these Stampin' Blends:
  • Light Shaded Spruce
  • Light Bermuda Bay
  • Dark Pool Party
  • Light Magenta Madness
  • Dark Rococo Rose
I chose these colors for the Make the Cards Challenge #13.

Make the Cards is partnering with Double Trouble's Challenge #82 - Flowers so I'm playing along with Thing 1, Thing 3 and Thing 2.

The sentiment is from Itty Bitty Greetings (retiring 5/3/21) and is adhered with Stampin' Dimensionals. Measurements are listed below in inches.


Thank you for stopping by today.

"We have His waves of grace amidst the storms of life."

Dr. David Jeremiah
Measurements:

Basic White: 4 1/4 x 11, scored and folded at 5 1/2, scrap for sentiment
Basic Black: 4 x 5 1/4, 2 1/2 x 5 1/8, scrap for sentiment mat
DSP: 4 1/4 x 5 1/2, 3 7/8 x 5 1/8, 2 3/8 x 5 1/8

Tuesday, April 20, 2021

Stampin' Up! Many Messages In Good Taste

Good morning, afternoon or evening...whenever you might be reading this post! Yesterday I participated in Sharon Armstrong's Mystery Monday Stamping and created this card...


I used a sentiment from the Many Messages Stamp Set by coloring the "Happy Anniversary" with my Night of Navy Stampin' Write Marker. The stamp is one big stamp with many sentiments on it. I went a little rogue because I didn't get the sentiment in the right area and my squares were placed too far apart so I brought out embellishments. But, then it is a mystery because you have no clue what it is supposed to look like!  If you haven't tried mystery stamping, what are you waiting for? You can find the mystery clues here.

Almost everything I used, I had laying on my desk...the new Pale Papaya cardstock (available 5/4/21), Misty Moonlight cardstock, Basic White cardstock and In Good Taste Designer Series Paper. All I had to get out was my Tasteful Textile 3D Embossing Folder, Misty Moonlight Silver Baker's Twine from the Flowers for Every Season Ribbon Combo Pack and Champagne Rhinestone Basic Jewels.

This was a quick and easy card to make. I loved Sharon's. You can it see at 28:17 on the video replay. I might just have to CASE hers!

I'm entering my card at:

 Crafty Catz Challenge #547 - ATG with optional twist of embossing, wet or dry 

Alphabet Challenge A is for Anniversary

SUOC 273: Use Designer Series Paper

Thank you for stopping by today...and because it was an "M & M" card...


Measurements:
Basic White Thick Cardstock - 5 1/2" x 8 1/2", scored at 4 1/4"
Colored Cardstock - 3" x 4 3/4"
Colored Cardstock - 2 3/4" x 4 1/2"
18" Baker's Twine
8 1" squares of DSP

Partial Product List

Links by TheseAreMyStamps.com

Monday, April 19, 2021

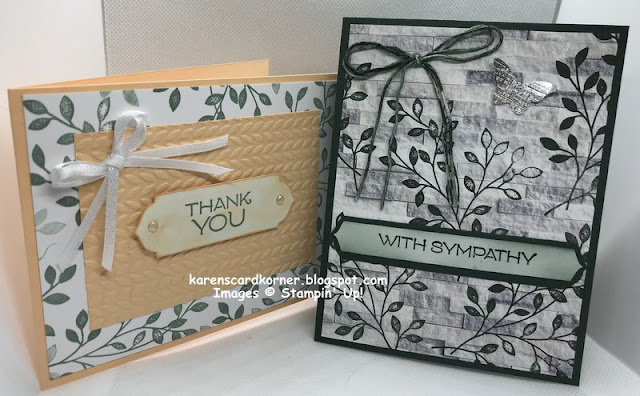
Stampin' Up! Vine Design Birthday and Sympathy Cards

Good morning, peeps! Hope you had a fabulous weekend. I had dinner company Saturday and we played games. Sunday I made three cards and today I'll show you two of them. One of the cards today is a makeover of one I'll be posting Thursday.

is why I'm showing you two cards. For their challenge, each card has to be a different design and for different occasions BUT it is required that you use the same stamp. It's a challenge, peeps! AND you had to use leaves!! Thus I chose to use the Vine Design Stamp Set (retiring in June).

My Thank you card has a base of one of SU's new 2021-2023 In Colors (available 5/4/21) and it's called Pale Papaya . The embossed panel is the same color and I used one of the Embossing Folders from the Greenery set to give it some texture.

I stamped a piece of Basic White cardstock with Soft Succulent ink (available 5/4/21) using the leaf image from Vine Design. The sentiment is from the Vine Design Stamp Set as well and is punched with the Treasured Tags Pick A Punch. I added 2 Genial Gems (available 5/4/21) and sponged it with Pale Papaya  ink..

Sweet Stampin' Challenge is "use something not usually used for crafting". Guess what I used for my double bow? They are the straps from a top my sister-in-law bought when she was here. She cut them off so they wouldn't be seen while wearing the top! (You know how that goes!!) and just fooling around, tied them in a bow. As you can tell, I put the bow in my stash...lol. Waste not, want not!! Allsorts #620 ATG also has a challenge of add a bow, so they get to see my card too!!!

The second card uses the same leaf image, I used the upcoming Evening Evergreen ink and stamped it on a panel of Designer Series Paper from the In Good Taste package. I adhered that to an Evening Evergreen card base. I colored the white twine (available 5/4/21) by dragging it through my Evening Evergreen ink pad. I should have been wearing gloves! My hands were a mess and I got ink on my sentiment so that's why I sponged it!

The silver butterfly is one I had in my stash and I adhered it with a glue dot after I bent the wings with my bone folder.

I am pleased with both cards and I hope you enjoyed reading about them. Maybe next Monday it will be a masculine, makeover, mystery card. I didn't deliver the  M & M's today as I had hoped, but I'll leave you with this one. 


Thank you for stopping by today and I hope you had fun...I did.


Stampin' Up! Masculine Patriotic Birthday Card for the Creative Creases Challenge Anything Goes with a Fun Fold

  Welcome to our Anything Goes With a Fun Fold Challenge. If you haven't played at Creative Creases Challenge before, what are you wai...