Monday, August 31, 2020

Stampin' Up! Tasteful Touches Friendship Card

Woo hoo! How excited I am!! I was blessed to win the StampingPals Challenge #5 and have been invited to be their guest designer for Challenge #7!!


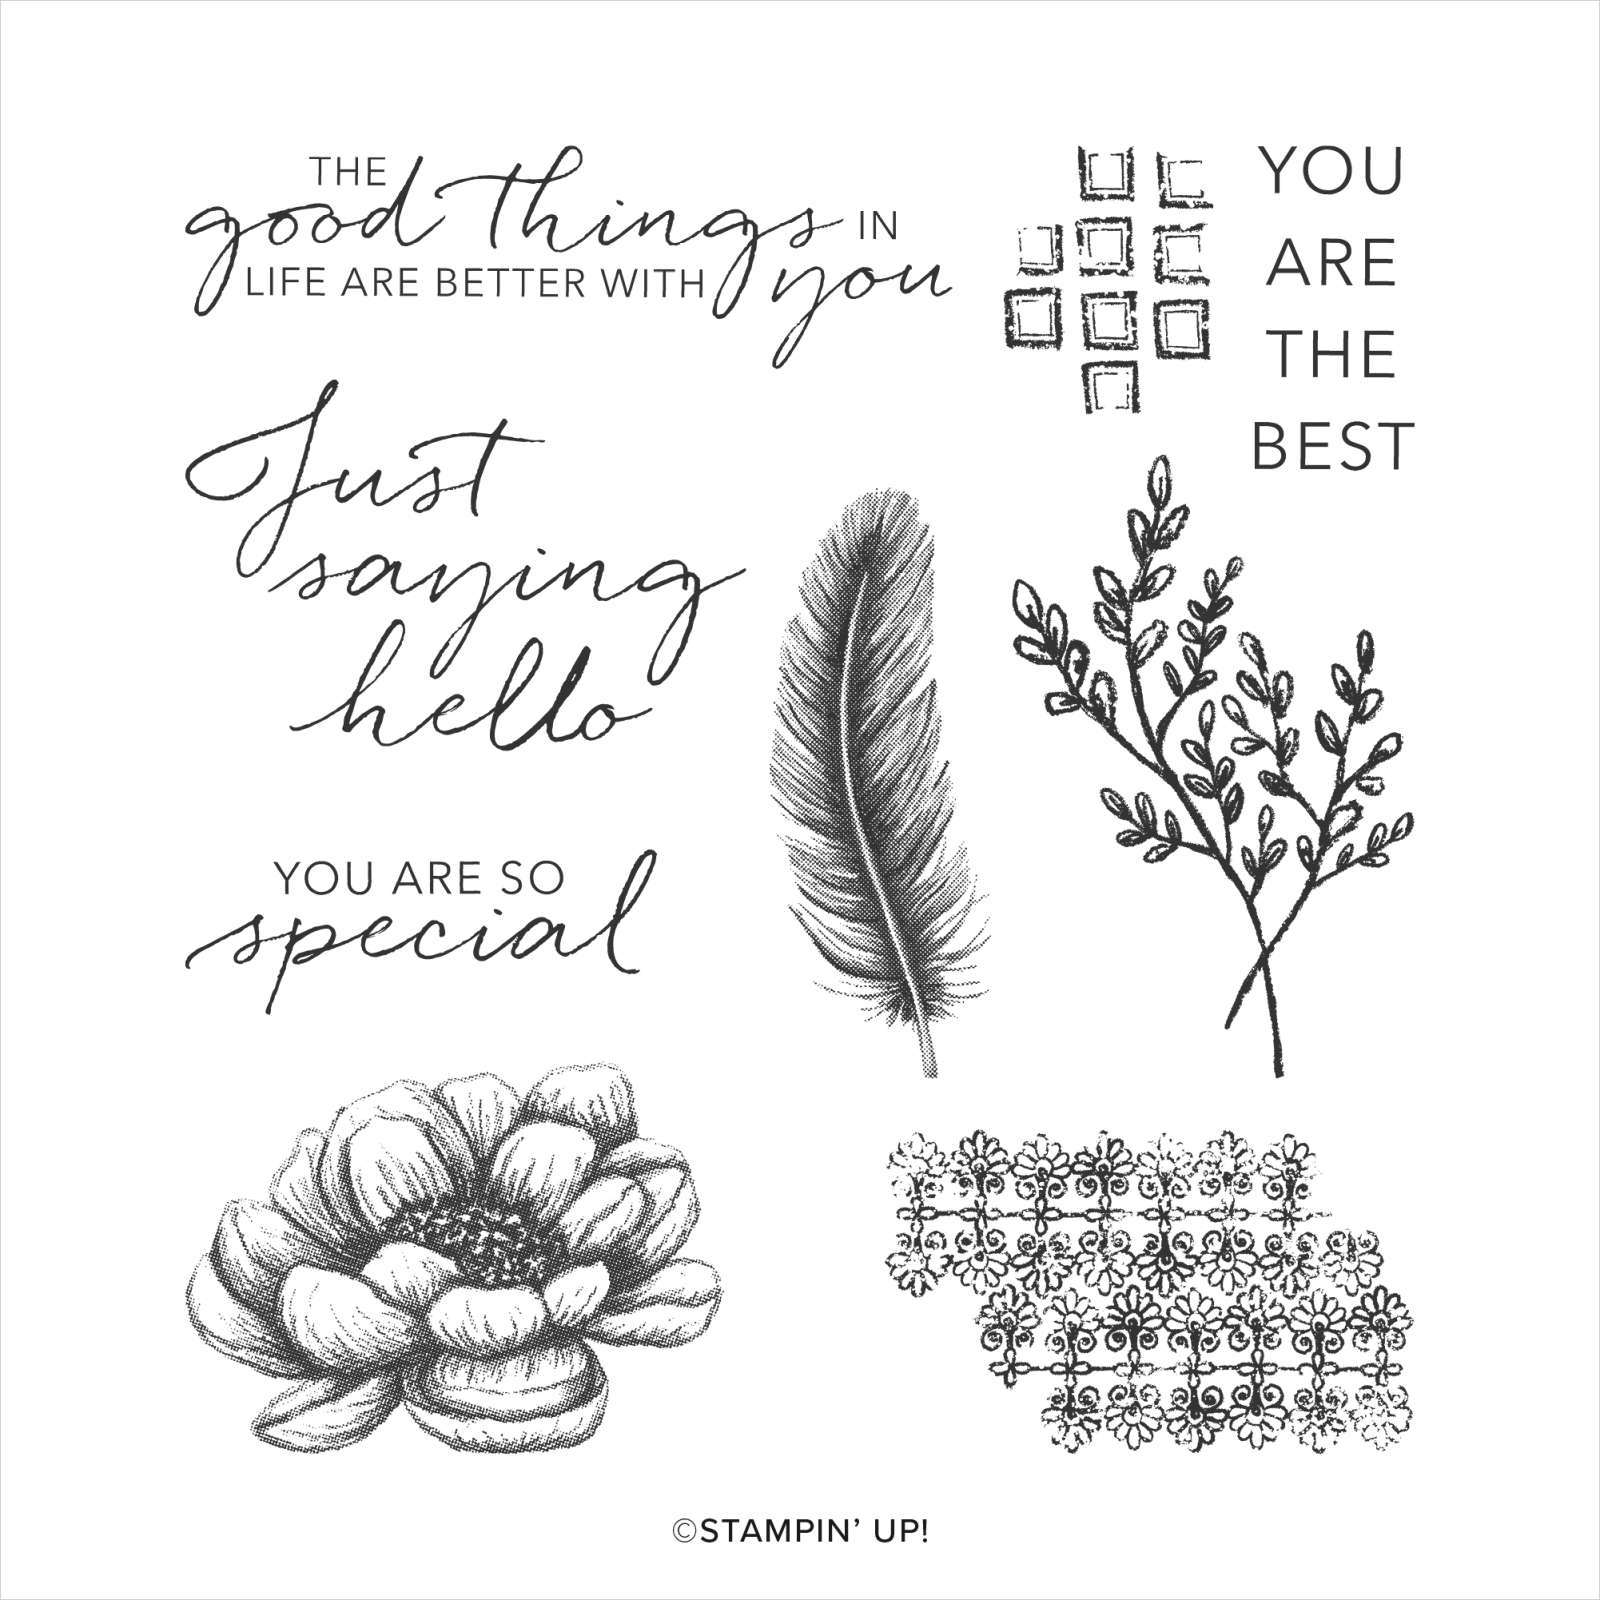
For the 2020-2022 In Color challenge I have chosen to use Just Jade, Magenta Madness, and Misty Moonlight. We are free to use black, white, or vanilla as well. I used the Tasteful Touches Stamp Set for my creation.

TASTEFUL TOUCHES CLING STAMP SET (EN)


My inspiration came from Melissa Kerman with her Fun Fold card.

Measurements are listed below, along with some needed supplies.

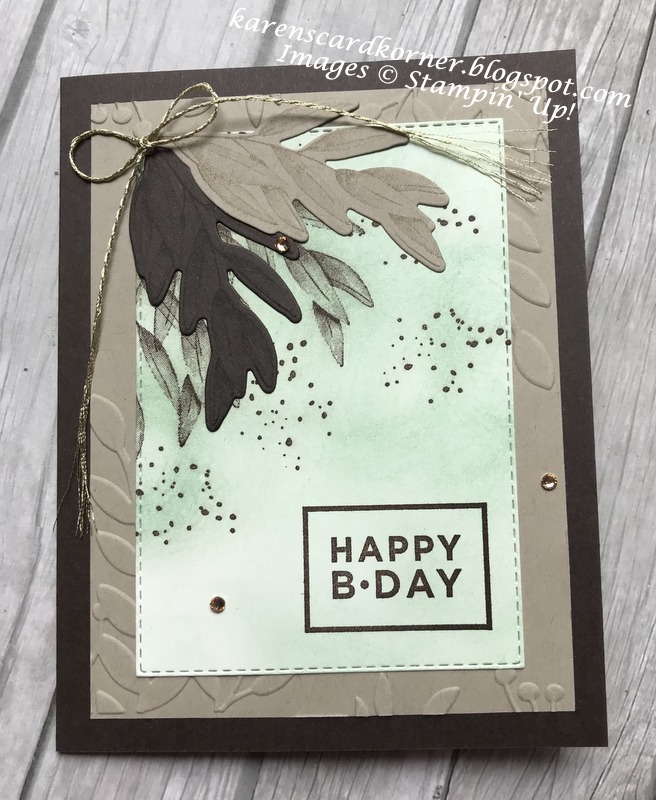
In essence, I started out with a piece of Misty Moonlight card stock on which I stamped the feather from Tasteful Touches in Misty Moonlight ink. Next time I will stamp closer to the edge. Then I stamped the arm for the flap with the feather. It barely shows so I would do that closer to the edge next time as well. I adhered that with Tear n' Tape to the right edge, half way between the top and bottom.

I then cut the actual piece that serves as the card out of Basic Black card stock. I stamped the foliage in Memento Tuxedo Black on the Whisper White panel and colored the leaves with my Light Just Jade Stampin' Blend. I adhered the inner panel and the outer Flowers for Every Season Designer Series Paper with liquid glue.  Next, I adhered the Basic Black card to the Misty Moonlight card base. Let's go step-by-step now:

  • Stamp the flower on the Whisper White square and color it with Light and Dark Magenta Madness Stampin' Blends. 
  • Stamp the foliage alternating between first and second generation and color with the Light Just Jade Blend. 
  • Adhere it to its black mat and then to the Just Jade square so that it makes a diamond shape. Here's a refresher...


Then on the back side of that diamond, adhere the second smaller square that is stamped with the foliage and colored the same as the other decorated pieces.


The next photo is about the DSP portion. 


On the DSP part, line up the sentiment, which has been treated like the other stamped pieces and adhere that with liquid glue, making sure it is hidden when the front flap is closed. I don't have the equipment to make videos but you can always watch Melissa's if you have questions.


I hope you enjoyed my card today and I'm grateful I had the opportunity to design for StampingPals. 

Measurements:

Mock card base: 4 1/4" x 5 1/2"
Actual card base: 3 11/16" x 11", scored and folded at 5 1/2"
Arm Flap: 1 1/2" x 4 1/4", scored and folded at 2 1/8"
Front focal: 2 1/2" x 2 1/2"
Mat for focal: 2 11/16" x 2 11/16"
Mat for mat: 2 13/16" x 2 13/16"
Inside Whisper White piece for written note: 3" x 5 1/4"
DSP: 3" x 5 1/4"
Inside for 2 foliage stamped pieces : 2 1/4" x 2 1/4"
Mats for foliage pieces: 2 7/16" x 2 7/16"

Partial List of Supplies:

Links by TheseAreMyStamps.com

Sunday, August 30, 2020

Stampin' Up! Forever Fern Sympathy Card

 The Forever Fern Stamp Set is so versatile. I've used it for a birthday card, wedding card and today a sympathy card.


I took the design from a card I received from one of my card group members when my husband passed away. I love anything asymmetrical and I think it's because my head is not always on straight...lol.

Copper is one of my favorite metals so I used it for my bow (ribbon is retired), sentiments, sponging (ink pad is retired), embossing powder (retired) and pearls. I also used Just Jade Ink and Crumb Cake for the leaves and berries. The mat behind the art panel is Rococo Rose Card Stock.  The sentiments are from the retired Flourishing Stamp Set. I colored my Pearl Basic Jewels with a Copper Sharpie. One of my favorite ways to use ribbon, twine or trim is to wrap it around the mat(s) and tie a bow. I just feel like it bring the whole design together. 


I'm entering my card at:
Thank you for stopping by today and I hope you are having a blessed Sunday.

Measurements:

Card Base: 4 1/4" x 11", score and fold at 5 1/2"
Mats: 3 3/4" x 5"
Scrap for sentiment

Partial Product List

Links by TheseAreMyStamps.com

Saturday, August 29, 2020

Stampin' Up! World of Good Memories & More Masculine Birthday

If you follow me, you know I love any Memories & More Card Pack and this one is no exception.

I made this for my grandson who is majoring in theater. I hope one day he will become a star and that I will get to see that event. This is a monumental year for him. He now is able to vote, drink and has his own apartment in Manhattan!

The card base that I used is one from her Close to My Heart donation. I do love the frayed edge and texture. I used one of the large pieces from the pack for the mat and cut one of the smaller pieces with my Stitched Rectangle Dies. I also cut a Whisper White mat for it with the same die set. I adhered 3 copper star embellishments.

For the inside, I cut a piece of Old World Specialty Designer Paper and adhered one of the small card pieces over top of it. I stamped the birthday sentiment in Night of Navy using a stamp from the Good Morning Magnolia Stamp Set.


I'm entering my card in these challenges:

Crafting Happiness Anything Goes Challenge #63

Double Trouble Challenge #65 Something, Anything, Everything. I'm playing with Thing 1 and Thing 2 (partnering with Crafting Happiness)

Just Add Ink Challenge #520 "Just Add Guys"

Sisterhood of Crafters "It's the Thought that Counts"

Thank you for stopping by today and I hope you enjoyed my card...my grandson did!

Friday, August 28, 2020

Stampin' Up! Heartfelt Birthday Card

 I was commissioned to create a birthday card for a friend's brother who is a Minnesota Twins fan. Their colors are Navy, Red and Gold. 

I used a sentiment from the Heartfelt Stamp Set to create the inside as that is what she wanted to say.  Here is what I created...

The baseball is from the retired 2004 Stampin' Up! Good Sport Stamp Set.

This is what the Heartfelt set contains...

HEARTFELT PHOTOPOLYMER STAMP SET (EN)

and for the front of the card...


The embossing folder is the current Hammered Metal 3D EF. The sentiment is one from the Fancy Foliage Stamps By Chloe. The little baseball is the unknown and they are adhered to Gold Foil that has been punched with a 1" punch.

She was pleased with what I created so that pleased me!

I'm entering my card at Just Add Ink Challenge #520

at Seize the Birthday: #198 Add Gold


at Aud Sentiments Challenge #258 ATG; and at Creative Knockouts #365 ATG.

Thanks for stopping by today and TGIF. Hope you have a fun weekend planned. Stay safe!


Thursday, August 27, 2020

Stampin' Up! Forever Fern Happiest of Birthdays for the Happy Inkin' Thursday Blog Hop


Welcome to the Happy Inkin' Thursday blog hop. You're in for a treat if you have never visited before. It's a weekly challenge and this week we have a color challenge. 

I can't wait to see what each team member has created. Hop along with us at the bottom of my post.

My design was inspired by Carole Baumgartner. I used the Forever Fern Stamp Set and Happiest of Birthdays Stamp Set to create my card today. The challenge is to use at least three colors from these choices...
Image may contain: text that says 'Happy Inkin Thursday Blog Hop August27 Color Challenge Pick At Least 3 Early Espresso Crumb Cake Mint Macaro Cajun Craze Very Vanilfa'
I chose to use Early Espresso, Crumb Cake, Mint Macaron and Very Vanilla.


I will list my card cuts after the list of hoppers. 

My card base is Early Espresso. I embossed a mat of Crumb Cake with one of the Greenery Embossing Folders.

The Very Vanilla art panel is cut out with the third from largest Stitched Rectangles Dies after stamping the images and sentiment. I also sponged the piece in Mint Macaron.

I cut a branch of Early Espresso and a branch of Crumb Cake that I layered on top of the branch image stamped in Early Espresso. I stamped the splatters in Early Espresso. All that is from the Forever Fern Bundle. I added a bow of the gold metallic 1/16" trim from the Forever Greenery Trim Combo Pack. The sentiment is stamped in Early Espresso using a stamp from Happiest of Birthdays. I added three Champagne Rhinestone Basic Jewels and the card front was done. Because of the splatters, I'm entering my card at Try it on Tuesday Splash and Splatter and Tuesday Throwdown #464 Ink Splatters.

For the inside, I used another stamp from Happiest of Birthdays using Mint Macaron ink. The branch is stamped in Crumb Cake.


I hope you enjoyed my card today and thank you for joining the hop. Clicking on the "next" button will take you to Akiko Sudano. Clicking on the names below will take you directly to the other team members and their projects.


Amy Koenders

MaryDeatherage

Kristi Gray

JaimieBabarczy

Sue Prather

Karen Finkle - you are here!

Akiko Sudano

KarenKsenzakovic

Card Cuts:

Base 8 1/2" x 5 1/2", scored and folded at 4 1/4"

Crumb Cake Mat: 3 3/4" x 5"

Very Vanilla:  3 3/4" x 5", then cut out with stitched rectangle die; 4" x 5 1/4" for inner panel


Wednesday, August 26, 2020

Stampin' Up! Forever Gold Sympathy Card

I've really been in a "let's use up retired schtuf" mode lately.  Today is one those cards.


I bought this pack of Designer Series Paper for this pattern alone. I just love it! I'd love to have these flowers in my garden!! It's from Painted Seasons, which was a Sale-A-Bration item in 2019. I adhered it to a base of retired Chocolate Chip card stock.

In my stash I found an embossed panel that was already stamped. It's from the retired Love & Sympathy Stamp Set. The font is great so I'll never part with it. I punched it out with my retired 2 1/4" circle punch. The card stock is retired Crisp Canteloupe, which was a 2013 In Color. 

Now here is where the new comes in! I adhered the circle to a Forever Gold Laser Cut Specialty Paper. This paper is to die for! You need it peeps! Just click on the picture and you'll be taken right to my online store :-)

FOREVER GOLD LASER-CUT SPECIALTY PAPER

Now we go back to a retired stamp set! The sentiment is from the Heartfelt Sympathy Stamp Set. It's stamped on Pistachio Pudding card stock, which was also a 2013 In Color. I used Shaded Spruce ink. I added a strip of DSP and more pieces from the Forever Gold. I had a die cut circle laying on my desk from the card I made yesterday. I dotted it with my white gel pen. Then I called it a day and it's already sold!


I'm entering my card at Hand Stamped Sentiments #346. What a gorgeous inspirational photo!

SUO #256 has a sketch challenge and I'm hoping they see how I've tweaked it and still recognizable using the Whale card.


Thank you for stopping by today and I hope you'll be back tomorrow for our weekly Happy Inkin' Blog Hop. I think you're going to like it!

Tuesday, August 25, 2020

Stampin' Up! Celebrate Sunflowers Birthday Card

Thanks for checking out my card today. It's a CASE of my friend's wedding card, which you can view here. Mary even has a video to help you along, if needed.

I used the Celebrate Sunflowers Stamp Set, which is bundled with the Sunflower Dies to create my birthday card. It's a double easel card, which means you have a card base 4 1/4" x 11", scored and folded at 5 1/2". The easel is a 4″ x 10″ piece of card stock, scored at 5 1/4″ and 7 5/8″ on the long side. Fold at the score lines – the 5 1/4″ score is a “valley” and the 7 5/8" is a "mountain". More measurements can be found at the end of my post, along with some of the supplies I used.


So, after you have your easel cut, scored and folded, you adhere the Designer Series Paper to it. Then adhere the easel to the card base.

Use the 2 1/8" x 3 1/2" Ornate Layers die to cut a Whisper White frame and adhere it to the larger DSP panel.

Use the Stitched Rectangle die to cut a piece of DSP that fits inside the frame. Approximately 1 3/4" x 3". Stamp your sentiment. I used a retired one from Well Scripted.

Stamp the big Celebrate Sunflowers image in Early Espresso on a scrap piece of DSP. Use the solid flower die in the Sunflowers Dies to cut it. 

Then with the outline flower die cut a scrap of Early Espresso. You can either do that with adhesive backing on the card stock or just glue the center to the solid flower.

Take the flower center die and cut a piece of Copper Foil and adhere it to the flower with a Stampin' Dimensional.

While you have the dies out, cut Copper Foil, Whisper White and Vellum leaf sprigs. 

Stamp the big leaf and two small leaves with Soft Sea Foam ink on scrap Soft Sea Foam card stock. Use the big leaf die and the double leaf die to cut them out.

Adhere the sprigs to the bottom portion of the easel being careful not to go beyond the edge of the card base nor higher than where your sentiment is. It's wise to do a dry fit first. Then adhere the sunflower on top and the leaves with liquid glue.

The banner sentiment is from Forever Blossoms and is stamped in Early Espresso on Crumb Cake card stock. Adhere with liquid glue.

Now, on to the inside...


On a piece of Whisper White card stock, I stamped the smaller sunflower in the corners. I used Early Espresso ink and colored them with my Petal Pink Light and Dark, Light Crumb Cake and Light Granny Apple Green Stampin' Blends.

I stamped the sentiment from Tasteful Touches in Early Espresso ink.

Adhere the sentiment panel to a mat of Petal Pink and then adhere it to the inside of the card base.

Et voila, fini!

I'm playing at:

Artsystamper Digitals Challenge #22 Fall Flowers

Double D Challenges: Sunflowers

Shopping Our Stash Challenge #427: Pile It On

Measurements:

Crumb Cake Base: mentioned at the beginning

Petal Pink Easel: mentioned at the beginning

Petal Pink Inner Liner: 4" x 5 1/4"

Whisper White: 3 3/4" x 5" for inner sentiment panel

DSP (retired Perennial Essence): 3 7/8" x 5 1/8" for the large easel panel; 2 1/4" x 3 7/8" (2) for the small easel panels

Partial Product List

Links by TheseAreMyStamps.com

Monday, August 24, 2020

Stampin' Up! Back on Your Feet Get Well Card

Good Monday Morning Makeover Madness! Hope you had a great weekend. My cards today are a CASE of my friend, Mary Deatherage. You can view her card here.

I had an order for two cards for people who were both having knee surgery so the Back on Your Feet Stamp Set was perfect for the occasion.


Neither of the recipients know each other so it was easy to make duplicates with just a slight difference on the front with the DSP strip, coloring and card base. The buyer loved them both, especially the retired Tropical Oasis Designer Series Paper. This pretty paper was my favorite from last year.

I colored the turtle with Old Olive, Mossy Meadow and Granny Apple Green Stampin' Blends and stamped the words in Terracotta Tile ink.

For the inside, I stamped the sentiment in Soft Suede and adhered a flower sticker from the retired Tropical Oasis Memories & More Pack.


I'm entering my card in these challenges:


Thank you for stopping by today and I have  measurements and a partial product list below.

Card Cuts

Soft Suede Card Stock or Old Olive: 4 1/4″ x 11″ (card base, scored and folded at 5 1/2″)

Terracotta Tile Card Stock: 4″ x 5 1/4″ (mats for card front and for inner liner); 3″ x 3 3/8″ (mat for art panel); 1 1/4″ x 4″ (mat for DSP strip)

Whisper White Card Stock: 2 7/8″ x 3 1/4″ (art panel); 3 7/8″ x 5 1/8″ (inner liner)

Tropical Oasis DSP: 3 7/8″ x 5 1/8″ (card front); 1 1/8″ x 3 7/8″ (DSP strip on front)


Pammie's Inky Pinkies Challenge #2411

Welcome to another PIP Challenge . Here is what I created for it... I just love the background digital from our   awesome sponsor ... This w...