Tuesday, June 14, 2022

Stampin' Up! Birthday Card


Welcome to another Inkin’ Krew monthly blog hop! We have added a new hopper to our very talented team...welcome Carol Buckalew. We are doing a blog hop featuring Stampin’ Up! products. This month we are all creating projects with a “Birthday" theme. Here is what I created for it...

I used the On the Horizon Stamp Set (birds and sentiment), New Horizons DSP, Horizon Dies (gate and tufts of grass), Pebbles Enamel Shapes (retiring June 30) and a chair I had in my stash from a retired die set (Seasonal Layers).

For the inside...


I sponged a piece of Basic White to mimic the front and used Evening Evergreen Ink to stamp the sentiment (Nature's Prints Stamp Set) and the image (On the Horizon Stamp Set). My card base is Evening Evergreen card stock.

I'm entering my card in these challenges:


Thank you for stopping by today and let's get hopping! Click on the "next" button to move forward to Terry Lynn Bright's project. Click on the "previous" button to move back to the project created by Mary Deatherage. You can also click on each name listed if you prefer.


  1. Jaimie Babarczy
  2. Carol Buckalew
  3. Karen Ksenzakovic
  4. Mary Deatherage
  5. Karen Finkle - you are here!
  6. Terry Lynn Bright
  7. Tara Carpenter
  8. Jillian Good
  9. Amy Koenders


Monday, June 13, 2022

Stampin' Up! 3D Fern Embossing Folder Birthday Card

Welcome to my Monday Morning Modified Makeover Madness.  I made this Modified Center Step card which was Masculine on May 27. You can see it here. I have even modified it more with different measurements.


My card base is Gorgeous Grape cardstock ( 5 1/2" x 8 1/2", scored and folded at 4 1/4"). Cut on each side 1 3/4" in, leaving the center flap 2" wide. My mats are Fresh Freesia and for the side pieces they measure 1 1/2" x 4". The fern pattern was created using the 3D Fern Embossing Folder and the technique I explained here. (June 3). They are cut at 1 1/4" x 3 3/4". I adhered everything with liquid glue, including adhering the flaps to the card base.


The Tea Boutique DSP for the inner center measures 1 3/4" x 4". The stopper mat of Fresh Freesia measures 1 5/8" x 1 5/8". The image is stamped in Granny Apple Green with a stamp from the Nature's Prints Stamp Set on a scrap of Basic White. It is cut out with  the second smallest die from the Stylish Shapes Dies. It is adhered with Stampin' Dimensionals to create the "stopper". The sentiment from the retired Hey Birthday Chick Stamp Set is stamped directly on the Tea Boutique DSP with Gorgeous Grape Ink.


For the center step bottom flap, I cut a piece of retired Pansy Petals DSP (1 5/8" x 1 5/8") and the Fresh Freesia mat is 1 3/4" x 1 3/4". 


The top part of the center step flap has another piece of the Tea Boutique DSP cut at 1 3/4" x 2 1/8". The Happy Birthday is cut with a die from the retired Chicks Dies out of a scrap of Gorgeous Grape cardstock. I wanted to draw attention to it so I adhered it cockeyed.


Thank you for stopping by today and I hope you'll be back tomorrow for our monthly Amy's Inkin' Blog Hop.

Friday, June 10, 2022

Stampin' Up! Love & Happiness Fun Fold

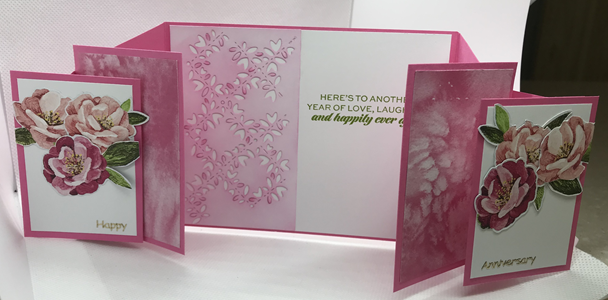
Oh my!! I’m so thrilled, and still can’t believe it: I’ve been asked to be Guest Designer for Debbie Mageed (Secrets to Stamping) at her June Creative Creases Challenge – Anything with a Fun Fold. This one is challenge #34. If you have come from her site, welcome. If you are here first, I hope you'll hop over to her post here.

I have chosen to use a fun fold that I saw Heidi Smith create. She got her idea from Susan Canfield. I love that demonstrators are so willing to let others CASE their cards. Susan called it a “Freestanding Floating Panel” card. I did several mock-ups before I made my actual card. I suggest you cut all your pieces at once and do a run through with temporary adhesive! Let’s take a look at my first attempt. You’ll be seeing the good, the bad, and the “ugh”ly!!

Card Cuts and Instructions:

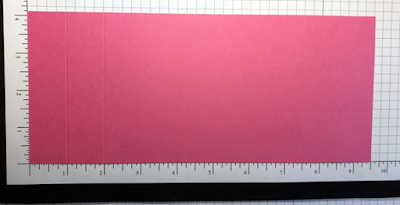
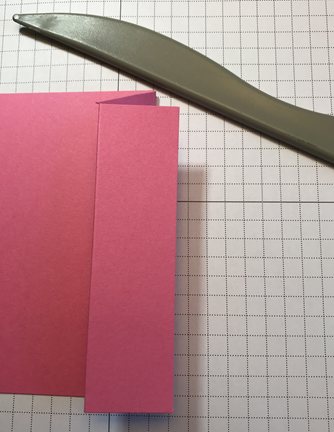
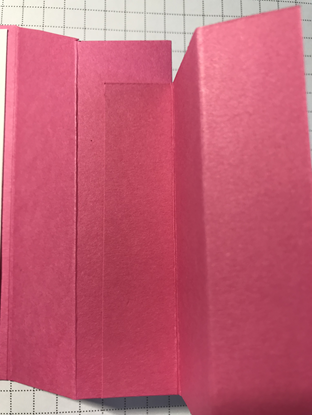
Solid Cardstock Base (Polished Pink): 9 ½” x 4 1/8”; score on long side at 1”, 2”, 7 ½”, 8 ½”
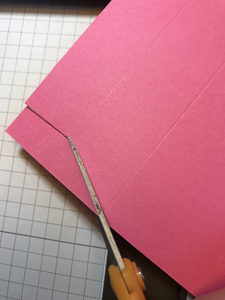
Cut ½” in to the first score line


Snip diagonally to the second score line on each edge of the card top

Fold into card at 2” score


and at the 1” score back on itself and burnish

Repe Repeat for the other edge. You should end up with this


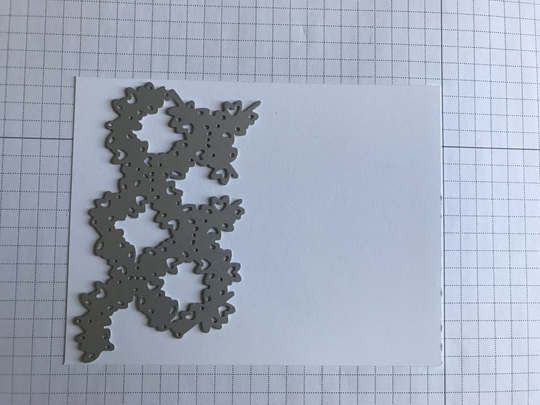
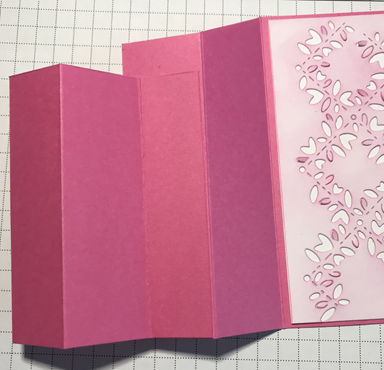
Basic White Inner Liner: 4” x 5 ¼”; run through die cutting/embossing machine with die from the Blossoming Happiness Dies


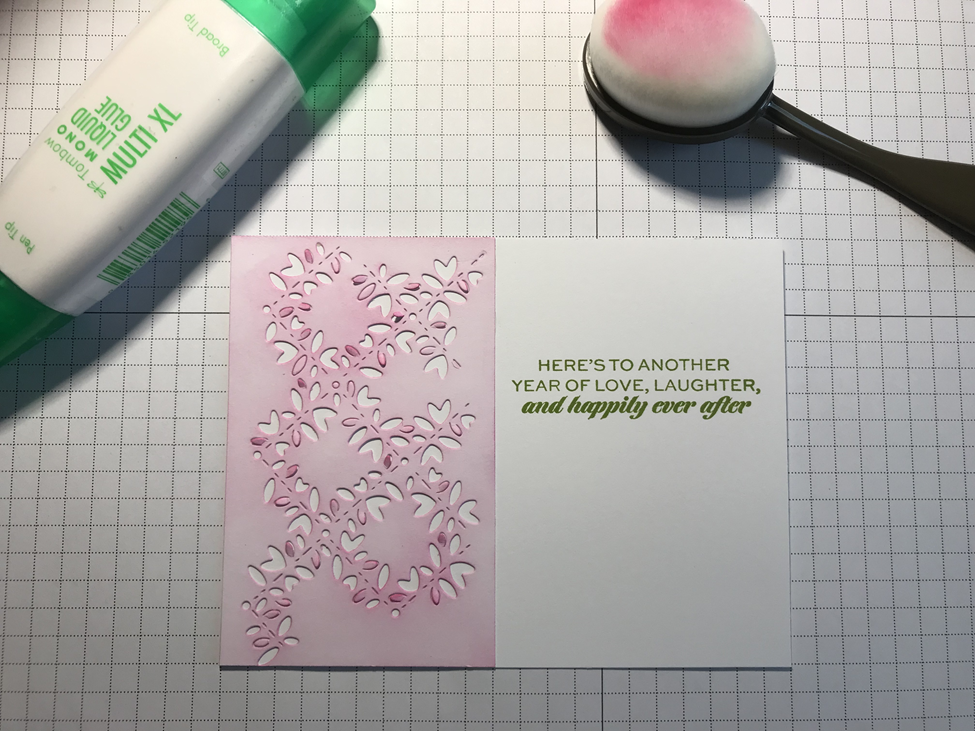
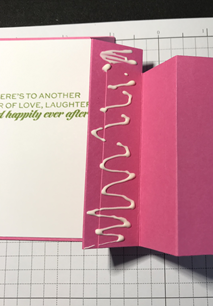
Stamp sentiment of your choice. My “Here’s to another year…” is a stamp from the Love & Happiness Stamp Set stamped in Granny Apple Green. This is where the “ugh”ly came in. I had stamped it on the die cut panel and had a halo. I did not want to run another panel through the die cutting machine so I chopped that piece off, stamped a new piece of Basic White, sponged the die cut part and adhered it to the new panel. Then I adhered it to the inside of the card. Where there's a will, there's a way!

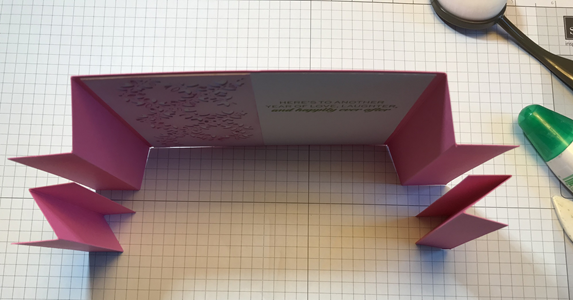
Solid Cardstock Mechanism for attaching to floating panels: 2 ½” x 3 1/8” (2); score on short side at ¾” and 1 ¾”; fold and burnish to make a “Z” shape.

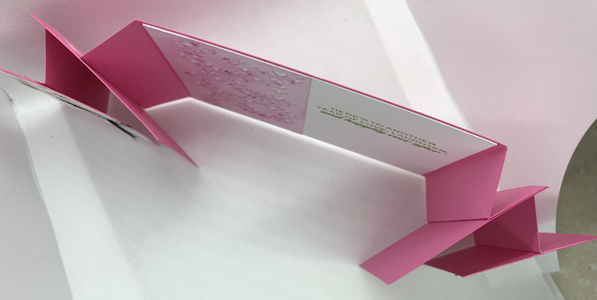
Adhere to outer base fold. Z form must go opposite way for each side and be lined up with outer edge of base fold. If you line it up with the inner fold, your pieces won’t fit properly. Don’t do this! I repeat, DON’T do this


Do this!!

The pictures show each side of the card, wrong and right, left and right…lol!

Designer Series Paper for the Large Floating Panel (New Horizons DSP): 2 ½” x 3 3/8” (2); adhere to Large Floating Panels with liquid glue. (No photo)

Next you’ll adhere the large panels to the Z folds.  You can see the “ugh”ly here from removing the incorrectly placed Z fold. BUT it didn’t matter because the large floating panel covered it!


Solid Cardstock Small Floating Panel: 2 ¼” x 3 1/8” (2)

Basic White Mat for Small Floating Panel: 2” x 2 7/8” (2); adhere to Small Floating Panel. Here comes some more “ugh”ly…brace yourselves!
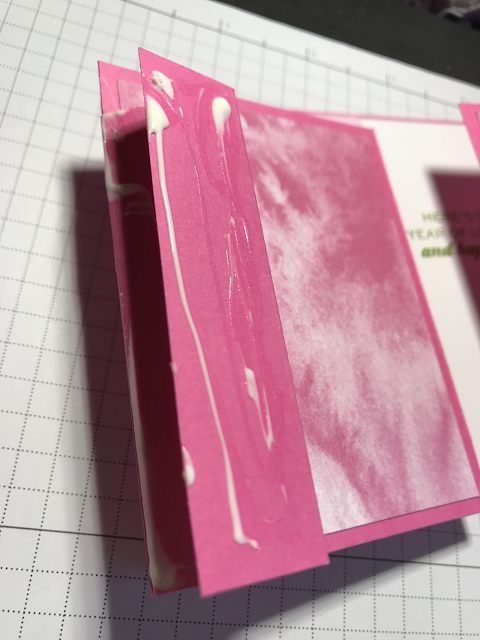
Adhere the small floating panel to the front of the Z fold but don’t do this...


Do just the front flap of the mechanism…don’t put glue on the inside edge!


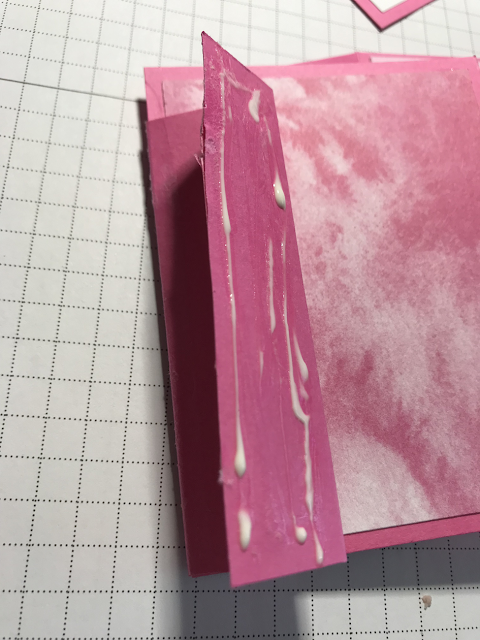
Number one, I had too much glue on the flap AND I put glue on the edge in back of it. You do want the small floating panel to come all the way out to the mechanism edge to hide the mechanism though. I removed the glue with cornstarch and a glue eraser. What a mess! “Ugh”ly!!

Fussy cut flowers and leaves from the Hues of Happiness Designer Series Paper (There is a pattern that you can use the coordinating dies. You’ll see that for my final card.) 

Arrange according to your preference and adhere to Basic White with liquid glue. You should end up with this...


I added the “Happy Anniversary” with Peel Off Stickers that I bought at a craft store and wrapped a length of Gold Simply Elegant Trim around the card and tied a bow.


Now, here is my final card using Fresh Freesia, Gorgeous Grape and the Hues of Happiness Designer Series Paper


I'm entering one card in the Creations in Pink: Challenge #46 - Mainly Pink and The Four Seasons Challenge June - Anything Goes Summer. The other card I am entering in Colorful Options - Precious Purple. Just look at their luscious mood board and M & M's to boot! 

Thank you for stopping by today and I hope you have a great weekend. 
Please come back on Monday for more M & M's!

Thursday, June 9, 2022

Stampin' Up! Slim Sayings Birthday for the Happy Thursday Inkin' Blog Hop


Welcome to the Happy Inkin' Thursday blog hop. You're in for a treat if you have never visited before. It's a weekly challenge and this week we have a sketch challenge. Here is what I created for it...

and here is our sketch...
I used the Slim Sayings Stamp Set, which will be retiring June 30, for my sentiments. The bicycle paper is from the Design a Daydream 12" x 12" Host Designer Series Paper. You can only get that if your order comes to $150 or more. I had to do it because I wanted the bicycles and there's a lot of purple in the paper as well!

My card base is Blackberry Bliss Cardstock cut at 4 1/4" x 11", scored and folded at 5 1/2". I cut a piece of Basic White Cardstock at 4" x 5 1/4". I dry embossed the top with the Into the Clouds Embossing Folder and the bottom with the Brick & Mortar 3D EF. I sponged the top with Pool Party Ink to reflect the sky and match the DSP. The bottom I sponged with Smoky Slate Ink so it looked liked pavers...hope I achieved that effect.

I cut a piece of DSP at 4" x 2 1/4" and adhered it to the embossed mat with Foam Strips.

Next I stamped the sentiment in Blackberry Bliss Ink on a 4" x 3/4" strip of Basic White. I used my Blackberry Bliss Stamp N Write Marker to create the faux stitching. I adhered that to the DSP with liquid glue. Because it's for a woman, I added three Rhinestone Basic Jewels. Then I adhered the panel to the card front with liquid glue.

For the inside...

I stamped the sentiment on a 4" x 5 1/4" piece of Basic White Cardstock. The bicycle is a cut out from the Windmill Fields Dies, which will be retiring June 30.

Clicking on the "next" button will take you to Akiko. Clicking on the names listed below will take you directly to team members and their projects. Thank you for stopping by and hopping with us! I hope you'll be back tomorrow for my fun fold.

Amy Koenders
Mary Deatherage
Kristi Gray
Sue Prather
Karen Finkle - You are here!
Akiko Sudano
Karen Ksenzakovic
Tara Carpenter
Terry Lynn Bright

Partial Product List

Links by TheseAreMyStamps.com

Monday, June 6, 2022

Stampin' Up! Brewed for You Birthday

Welcome to my Monday Morning Masculine card post. It's also a fun fold day. I do love my fun folds! The Diamond Flip card was inspired by Cindy Lee B. I do believe she lives just up the road from me!

My card base is Sahara Sand Cardstock 4 1/4" x 11", scored at 2 1/8" and 5 1/2". 

On the inside right I have a Basic Black mat that measures 5 1/4" x 4". I had some old paper (Birch) from Office Max that I cut to 5" x 3 3/4" for the image, sentiment, bubbles and hop to rest on. I stamped the growler with Early Espresso Ink (same for the sentiment and bubbles) and colored it with my Bronze Stampin' Blends. The hop and leaves are cut with the Brewed Dies. I used Old Olive Cardstock for the leaves and Parakeet Party for the hop. I added a little Old Olive to the hop with my Stamp N Write Marker and colored in the openings with my Light Old Olive Stampin' Blends, trying to achieve the look of a real hop!

On the inside left, I adhered another piece of He's the Man DSP (3 1/8" x 4") with liquid glue. The "Cheers to all your Years" circle is a cut out from He's the Man. I love this paper package. If you hate making masculine cards, this paper will help you fall in love!

For the outer part of the card, I made a mark 2 1/8" down from the top and cut from that mark to the score line on either side. For the diamond part, I cut a piece of Soft Succulent Cardstock 2 7/8" x 2 7/8" and adhered the left side to the fold, leaving a border. Next I cut another piece of DSP from He's the Man 2 5/8" x 2 5/8" and ran it through my cutting machine with the Dots & Spots Dies. I adhered that with liquid glue, sparingly!

I cut a piece of Designer Series Paper from He's the Man at 3" x 4". I also cut a strip of Soft Succulent Cardstock 3/4" x 4" and stamped it with another sentiment from the Brewed for You Stamp Set still using Early Espresso Ink. I adhered it to the back edge of my DSP and then cut the DSP right edge so that the joined pieces would measure 3 1/8" across and adhered it to the front.

This card is for my son-in-love and he does like Guinness beer so I tried to achieve that look with the Brewed Dies, Light and Dark Soft Suede Stampin' Blends and Light Smoky Slate Blends. I adhered the right one with liquid glue and the left one with Stampin' Dimensionals. The foam is also a cut from the Brewed Dies. I sponged the foam lightly with Soft Suede Ink.

I'm entering my card in The Paper Players theme challenge chosen by Anne Marie...


at Make the Cards Challenge #56


and at As You See It Challenge #276 - Here's to Beverages!

Thank you for stopping by today and I hope to see you again on Thursday for our weekly hop.

Partial Product List

Links by TheseAreMyStamps.com

Stampin' Up! Fern & Flora Friendship Card

Good Thursday morning, peeps. Today I am finally using items that are new but I haven't used AND I'm using some old. Take a look see...