I don't usually do a fun or fancy fold card on Friday as I leave that up to my teammate, Karen K. But today I just have to welcome you to my farewell fancy fold card because I'm playing at Inspire.Create.Challenges #073 Theme.


There is a couple at the Celtic Ray who are moving from Punta Gorda to the east coast of Florida and this card is for them.
I used the Beautiful World Stamp Set, Old World Dies, and the coordinating Old World Specialty Designer Series Paper for my card. Pay close attention to the bottom part of the DSP :-)

Why, yes...Punta Gorda and the east coast of Florida. How perfect is that! ....and the sentiment couldn't be more perfect for the challenge at As You See It #229. Although it doesn't speak of vacation inside, I feel it does outside. They are going on vacation after their move and it's to Key West!

Now, I did not come up with this fancy fold on my own. It was the idea of Glenda Calkins, another Stampin' Up! Demonstrator. So, I decided to CASE her card. I know there are other videos out there of a similar fold but hers is differently constructed.
This is an overhead shot of how the fold looks.

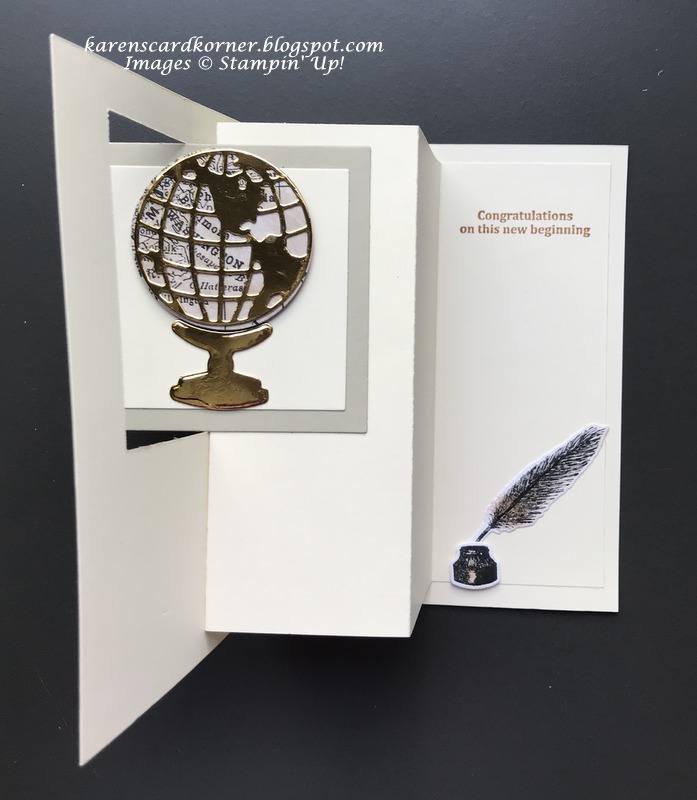
and here is how it looks when it is opened...
It was quite easy to create and you can watch Glenda's video if my instructions aren't clear enough.
- Very Vanilla Card base (referred to as "solid": 5 1/2" x 8 1/2", scored and folded at 4 1/4"
- DSP Mat: 5 1/4" x 4"
- Adhere together with liquid glue BUT don't put glue in the center where you'll be cutting out the square!
- Cut square out of card front with largest Layering Squares Die. This gives you two separate pieces...solid and DSP.
- Take the DSP square and use the circle die from the Old World Dies set to create the under piece for the globe which is cut with another die from the set.
- Take the solid square and cut it with the next to largest die.
- Take the largest die and cut another square of another solid color.
- Adhere these two squares together with liquid glue.
- Cut the globe and base out of Brass Foil with dies from Old World. Adhere the globe to the DSP circle. Adhere the globe base to the square piece and adhere the globe with Dimensionals.
- Stamp sentiment on scrap and punch with Lovely Labels Pick A Punch. Add three metallic pearls.
- Wait to adhere sentiment to front with Dimensionals after you have the inside done.
Now for the inside refresher...

- Take a piece of solid card stock 5" x 8" and score at 2", 4" and 6".
- Stamp the sentiment on the last 2" panel.
- Stamp the ink well and quill pen on scrap and die cut with Old World Dies.
- Fold the score lines so that it looks like the photo.
- Adhere the back fold to the card base with liquid glue. Make sure the left side lines up with the back of the card front when laying flat.
- Put liquid glue on the left edge just enough to secure it without any glue showing through the window.
- With the card closed, put glue on the right hand side of the square and place your globe square inside the opening. Wait a few minutes before opening the card.
- Once you are sure everything is moving correctly, adhere the quill with liquid glue and the inkwell with a Dimensional.
Let me know if you try this and if my directions were successful in helping you.
The stamp set and dies bundle has been my favorite for a number of days, along with the DSP. There is so much you can do with it. Because of that, I'm going to enter my card in the challenge at Stamping Pals #5 for July.

Thank you for stopping by today and, as always, I appreciate your comments.
")


Links by TheseAreMyStamps.com


LOVE this Karen :) I'm going to have to try that fold this way instead of the way I did it. Beautiful card.
ReplyDeleteThank you, Karen.
DeleteAwesome card and fun find in on the designer paper! :)
ReplyDeleteThank you, Amy.
DeleteBeautiful, Karen! And who knew Punta Gorda would be on that map! Your friends will love it! I'm going to have to look at this paper more carefully. This is an awesome fold...I can't wait to give it a try! Thank you for playing in my fun and fancy fold challenge at The Paper Players this week!
ReplyDeleteThank you so much, Ann.
DeletePerfect perfect perfect! Love this fold. LOVE that you've got Punta Gorda front and center - what a happy find in the DSP! Thanks for sharing, Karen! :)
ReplyDeleteThanks, Mary.
DeleteWow, this is so cool! I will check out her video! I love what you did with the fold as well as the papers! And my aunt lives in Punta Gorda too! Thanks for playing with our Fun Fold challenge this week !♥
ReplyDeleteThanks, LeAnne. I'll have to get her name to see if I know her!
DeleteThis is absolutely fabulous! I like this fold - I've only ever used it a couple of times before but you've reminded me how pretty it is. The way you've designed the front with the map and filagree globe is just lovely. Thanks for joining in with us again at As You See It.
ReplyDeleteThank you so much, Jan. It was my pleasure to play at AYSI and thanks for commenting on their behalf.
DeleteGreat card and your DSP placement is perfect! Thanks for playing with us at The Paper Players!
ReplyDeleteThank you, Allisa.
DeleteFabulous fun fold! Thanks so much for joining us over at The Paper Players!
ReplyDeleteSuch a cool fancy fold!!! And the combination of neutrals and metallics are beautiful! Thanks for sharing your vacation dreams with us at As You See It Challenges.
ReplyDeleteI love the fold and how fabulous that the paper is so perfect for your project! Thanks for sharing with us over at The Paper Players and As You See It this week!
ReplyDelete