Saturday, June 30, 2018

Stampin' Up! Picture Perfect Birthday


This is another card with we made at card group Thursday. Meg brought the kit for this one. Of course, those who know me, this is my favorite color...Lemon Lime Twist! Purple is my second favorite. The DSP is no longer available, but you can order the stamp set here

Here's a link to a tutorial if you could like to create the Double Triangle Fold.


Buy 3 Get 1 Free Designer Series Paper Sale July 1-31!

Stampin’ Up! knows how much you loved their Designer Series Paper sale last year, so they’re bringing it back again!  With an incredible offer of buy 3, get 1 free on select Designer Series Paper, July is a great time to stock up!
The sale will run from July 1-31 and will include designer papers on the list below.  You can select any combination of 4 packs from this list for this sale!
This awesome sale starts tomorrow, July 1 so get your lists ready!!  Let me know if you have any questions.  Happy shopping!

Friday, June 29, 2018

Stampin' Up! Detailed Dragonfly Part 3!!

So, on June 23 and June 26, I used this same die set and today I have CASE'd the card again.


I used the same Whole Lot of Lovely DSP but used Pool Party card stock for my dragonfly and retired Black Rhinestones. 

This was the card kit I prepared for our card group yesterday. Sue M. had a delicious lunch prepared for us...Joanna Gaines' Asparagus Quiche, fruit and brownies. We celebrated Edie's birthday. I was supposed to host but Perry and I had appointments with the dermatologist. My news was good, his was not.  Here we go again with more cancer. The other gals each brought a kit to lighten my load. We have such a great, caring group. I'll be posting those cards later.

Not only is our group great and caring, they are ingenious too! I forgot the punch I needed for them to put their card together! If you read my other posts, you know I used the Classic Label. You can also use the retired Word Window punch. Sue had neither...but she did have a die of unknown origin that was a little bit wider and it still worked!

I think I'm almost done CASEing this card, but I have one more up my sleeve! I hope you will return to see it!!

Thanks for stopping by.


Thursday, June 28, 2018

New Stampin' Blends are Available in the Stampin' Up! Online Store!

Stampin' Blends Blendable Alcohol Markers for Crafts

YAY!!!!  They’re finally here!!  The new colors of the Stampin’ Blends are in the online store!!  Can’t wait to get my hands on those new colors too!  The full collection is now available!


You can see them all here in my online store!
Happy shopping!!

Stampin' Up! Accented Blooms

Welcome to another Thursday hop. This week we have a color challenge...

Image may contain: text

and here is what I made for the hop today.


The measurements and products used are listed after the other Happy Inkin' Thursday Blog Hop members.

Although the photo doesn't look like it, my card base is Very Vanilla. (To me these pics look like Whisper White.) I added a mat of Mossy Meadow, then a mat of DSP from Share What You Love, which is Petal Pink in color. Then I adhered a smaller mat of Mossy Meadow. 

My focal piece uses a piece of Very Vanilla. I used my embossing buddy to be sure the panel would be clear of any oils from my fingers. Then I stamped the corner flowers in Versa Mark Ink and heat embossed it with White Emboss Powder. I colored the flowers and leaves with my Petal Pink and Mossy Meadow Stampin' Write Markers.

I used the Tailored Tag punch to punch a plain Petal Pink piece. I stamped the Thank You using another stamp from Accented Blooms. It's stamped in Mossy Meadow and fussy cut so it would be smaller than the Petal Pink piece. I adhered it to the pink with dimensionals. Then I glued that to the focal panel.

The cut out on the upper right corner was done with the Detailed Trio Punch. Then I adhered the focal panel to the Mossy Meadow mat using liquid glue. Card front done!

For the inside I just adhered a mat of Mossy Meadow and a mat of Very Vanilla. I used my Stampin' Write Markers again to color the little flowers from the same stamp set. Again, in the corner, I used the Detailed Trio Punch. I didn't use a sentiment so there would be plenty of room to write a personal note.


I thank my upline and friend, Mary Deatherage, for letting me CASE her card, which you can view here.


I hope you'll click on the "Next" button below that will take you to Julie Johnston's wonderful project. Clicking on each name will take you directly to that team member's equally wonderful project. Thanks for stopping by.


Wednesday, June 27, 2018

Stampin' Up! Painted Glass and Enjoy Life


This will be another quick post because today has been doctor day and dealing with technology day!

Before I embossed my Whisper White card base with the Sparkle TIEF, I stamped the sentiment from Painted Glass. I used my Lively Lipstick and Blueberry Bushel Stampin' Write Markers to ink up the stamp. 

I punched the Lively Lipstick and Blueberry Bushel 1 1/4" pieces of card stock with the retired Confetti Star  punch and adhered them to the card base.

For the inside...


I had 1/4" strips of Lively Lipstick and Blueberry Bushel which I adhered at the edge. The sentiment is from Beautiful Bouquet. The silhouettes are from Enjoy Life and the fireworks are from the retired In the City hostess stamp set.


Thanks for stopping by and be sure to tune in tomorrow for our Happy Inkin' Thursday Blog Hop. C ya!

Tuesday, June 26, 2018

Stampin' Up! Free Ink Pad Assortment Joining Offer July 1 - 31

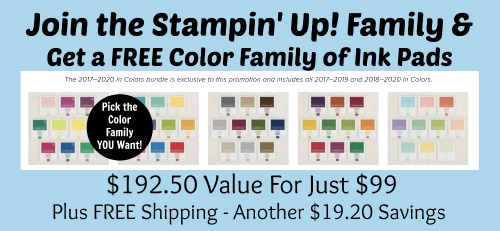
Woo Hoo!!!  Stampin’ Up! is offering an awesome joining promotion during July!  During this promotion, new recruits will receive a FREE assortment of Classic Stampin’ Pads of their choosing with their Starter Kit!


The Starter Kit is just $99+ applicable taxes and you get to choose $125 in Stampin’ Up! merchandise.  Your Starter Kit ships for free!!  Yippee!!  If you’ve ever considered joining, July is the PERFECT time…$125 in Stampin’ Up! products plus a FREE assortment of ink pads, that’s a $192.50 in product for only $99!!


You can select from any of the ink pad assortments on the flyer above:
  • 2017-2019 In Colors & 2018-2020 In Colors Color Collections
  • Brights Color Collection
  • Neutrals Color Collection
  • Regals Color Collection
  • Subtles Color Collection
Demonstrator Perks in a nutshell:

  • Save 20% off all your purchases or Earn 20% on all your Sales (with the potential to increase it to 25%)
  • See/purchase from the Holiday Catalog before anyone else in August
  • Attend OnStage Live in Orlando, FL in November 7 - 10. It's the Demonstrator only Stampin Up Convention (travel, hotel and registration additional cost)
  • See/purchase from the Occasions Catalog before anyone else in December
I’d love to have you join the team!  We welcome all types of Demonstrators from those only purchasing to get the discount for themselves to those who want to run a business and those anywhere in between!
There is no commitment and no penalty if you decide that being a Demonstrator isn’t right for you.  Why not give it a try?  We have a fun Facebook page where we chat a lot and we do virtual meetings monthly and in-person meetings quarterly.   Drop me a note at floridafinkles@gmail.com if you have any questions.  You can also see more information about the benefits of becoming a Stampin’ Up! Demonstrator here.
Here is the fine print from Stampin’ Up! for this promotion:
Promotion Dates: July 1–31, 2018
Details
  • Free assortment of Classic Stampin’ Pads available only to new demonstrators who submit applications within promotion dates.
  • Each Stampin’ Pad Family is an assortment of 10 coordinating ink pads from one of the following color collections: Brights, Neutrals, Regals, Subtles, and 2017–2020 In Colors.
  • The 2017–2020 In Color Classic Stampin’ Pads bundle (item 150289) is exclusive to this promotion and includes all colors in both the 2017–2019 In Colors as well as those as the 2018–2020 In Colors.
  • The Neutrals assortment does not include the three Basic colors: Basic Black, Very Vanilla, and Whisper White.
  • New demonstrators who submit their IDA before July 1 or after July 31 will not be eligible for this promotion.  So if you’re interested in joining, make sure that you join between July 1 and July 31!!
  • Deadline to join: July 31, 2018; 11:59 PM (MT).
Let me know if you have questions, I’m happy to answer anything! If I don't know the answer, I know my uplines, Mary and Amy have them!  Join us in July, you’ve got nothing to lose!

Stampin' Up! Detailed Dragonfly Again!

Saturday I posted a card that I made with the Detailed Dragonfly Thinlits, using patterned paper that I created from the Rooted in Nature stamp set.

Today's card uses the same thinlits but a retired patterned paper from Whole Lot of Lovely. Here it is for your viewing pleasure...


I consider this an interactive card because it looks like the dragonfly is on top of the card, but when you open it, it's really on the inside! 

Thus, I am playing at Tuesday Throwdown #398 today. It has wings so I'm also playing at Try it on Tuesday.

My card base is Whisper White. I embossed the right side with the one of the TIEF's from Petal Pair. The DSP is from the retired Whole Lot of Lovely. My dragonfly is Calypso Coral and the inside sentiment is from Enjoy Life. Instructions for how to create it can be found here.

Thank you for stopping by and I'll see you tomorrow!

Monday, June 25, 2018

Stampin' Up! Established Elegance

Here's another card we made at Thursday card group. It uses the Established Elegance stamp set. I have no idea when the set was produced or retired, so if you do, I'd appreciate it if you'd let me know.


I'd also appreciate knowing if this is considered Shabby Chic or Vintage. I don't even know what those terms mean in the world of card making, but I would like to learn. Then I can enter the proper challenges when it involves either of those. 

We stamped the front in Crumb Cake ink and the card base is Crumb Cake. The mats are Basic Black. I have no idea what the two pieces of DSP are but the one with black swirls is velvety. The pearls are current but the metallic button is retired. The writing on the bottom is a piece of washi tape.

I thought this would suffice for an anniversary card so on the inside I used the stamps from Floral Phrases. That stamp set has been around since 2016. I'm so glad I dusted it off today!

Retro Rubber Challenge #89 - RRCB89 has a Tic Tac Toe challenge and my card fits the bill for the bottom row across...metallics, congrats and gems. In addition to that, you must use a stamp that is older than a year. I used two sets that were older! Thank you, Jan, for this delightful challenge.

RRCB 89

Thanks for stopping by. C ya!


Sunday, June 24, 2018

Stampin' Up! Happy Birthday Gorgeous

This is gonna be a quicky today as we are off to Sunday School and then I've got some house cleaning to do. I miss our cleaning lady as a friend and person who loved to serve others.

Almost everything for this card is retired and we made it at card group Thursday. The only current items are the Night of Navy and Whisper White card stocks, ink and Celebrate You Thinlits.


Project Details—All Products SU! Unless Otherwise Specified
Stamps Happy Birthday Gorgeous (retired)
Card stock & Papers     Whisper White, Night of Navy, Floral Boutique DSP (retired)
 Ink Night of Navy
Accessories Rhinestone Jewels
Tools     Celebrate You Thinlits, Boho Blossom Punch (retired)

Thank you for stopping by today.

Saturday, June 23, 2018

Stampin' Up! Rooted in Nature, Enjoy Life and Detailed Dragonfly Thinlits

My card today uses a sentiment from Enjoy Life. I made my own patterned paper with the stamps from Rooted in Nature. I have to give credit to Rachel Tessman for the pop up design. She used Nature's Poem DSP but I haven't ordered that yet.


There is no sentiment on the outside because it's here...


This card is so easy to make. Measurements and product list are below. The colors I used to make my own DSP were Gray Granite, So Saffron and Mint Macaron.

First you make your card base using Thick Whisper White. Cut your inside piece of DSP and adhere it. Using the Detailed Dragonfly Thinlits and the Big Shot, cut out your detailed dragonfly in black and the plain dragonfly in vellum. Adhere them together. Because I used dies and there's lots of "white space", I'm entering my card at Happy Little Stampers June - Anything Goes With Dies and Happy Little Stampers June CAS Challenge.

Punch two sets of vellum leaves using the leaf punch. Adhere them to the outside piece of DSP. Adhere the DSP to the card front placing it 5/8" in from the left side. 

Take the classic label punch and position it where you want the dragonfly to be in the opening. The punch goes all the way in, you just have to determine the vertical placement. Move the punch down and punch just a little bit more at the bottom to accommodate the length of the dragonfly. Once you've punched the opening, lay your butterfly on top to be sure the length is correct. 

Pinch the wings together, put liquid glue on the bottom of its body and adhere to the inside through the opening. Make sure it's dry before you open and close the front. Once it's secure you can add bling or pearls to the top of his body.

When the card is closed the wings should be spread out. When you open it, the wings fold up by themselves. Stamp the sentiment where indicated. Now you're ready to mail it out!

Thanks for stopping by. Let me know if you have questions. C ya!

Measurements:

Card base: 8 1/2" x 5 1/2", scored and folded at 4 1/4"
DSP for inside: 5 1/4" x 4"
DSP for outside: 2" x 4" or 2" x 4 1/4" if you want it to go all the way to top and bottom of card front
Basic Black scrap for detailed dragonfly
Vellum scraps for plain dragonfly and leaves

Product List:

Leaf Punch
[144667]
$16.00
Big Shot
[143263]
$110.00

Friday, June 22, 2018

Stampin' Up! Apron of Love and Waterfront

There are some stamps that are retired that I cannot part with and today I used one set to complement the Apron of Love. More about that later.

We have friends who bought a camper after Perry and I had to sell our RV and stop traveling so I travel vicariously through them. They tow their trailer behind their truck so I thought my DSP would be appropriate for a card for his birthday next week. 

I was inspired by the sketch at Try Stampin' on Tuesday or Not #369


The challenge at Stamp Ink Paper #155
this week is Summer Fun and I think camping fits right in with that. There were bugs on my DSP but that part I cut off because I do not like bugs and neither do they...lol. 

And, last but not least, Inspired by Challenge - Backyard BBQ

Take a gander (no there are no ducks in the DSP!)...


My card base is the retired Chocolate Chip and the DSP is from the retired Pick a Pattern. The apron bottom is the opposite side of the camping design. I printed out the sentiment on the banner in Word. 

The words on the apron are from that stamp set. I only intended to use the BBQ part but after I stamped the utensils, I realized they were the baking ones so I added the second phrase! I tried to stamp the BBQ utensils on the bottom of the apron but it didn't work out so I die cut the bottom of the apron and adhered it to the full apron. Aren't the apron strings the cutest? and those little pockets? This is a great stamp set with matching dies if you are a chef, baker or still tied to your mother's apron strings!

For the inside, using Call Me Clover, I stamped the sentiment from Bear Hugs, which I mentioned is retired.


I used the Waterfront stamp set to create the waves and shadows in the water. I used Blueberry Bushel, stamping off once (except for one time, which was an oops) and also using Pacific Point, stamped off once. I sponged the very bottom with Balmy Blue and Pacific Point. The fish, from Bear Hugs, are stamped in Memento Tuxedo Black ink. The sun, from the Waterfront set, is stamped in Pineapple Punch. The sky is sponged in Balmy Blue.

Thank you for stopping by and I'll see you tomorrow!


Thursday, June 21, 2018

Stampin' Up! Lovely As a Tree for the Happy Inkin' Blog Hop

Image may contain: text

Here we are for the second time...blogging jointly with Sandi MacIver's team and Amy's. This happens once a month and today we have our choice of following the sketch and/or the color challenge. I have chosen to do both!

No automatic alt text available.Image may contain: text

I have used Lovely as a Tree for my art panel and a sentiment from Sheltering Tree. 


My card base is Fresh Fig with a mat of Bermuda Bay. I watercolored my scene using an Aqua Painter, Fresh Fig, Bermuda Bay and Pear Pizzazz ink pads. To achieve the darker colors, I used my ink refills. 

I wrapped my Fresh Fig ribbon around the mat and secured it with tape on the back. I made a separate bow and glued it on the ribbon. 

The sentiment is stamped in Fresh Fig on a piece of Watercolor Paper. The little leaves are from the Beautiful Bouquet stamp set and were stamped with Bermuda Bay. 

This will be a note card so the inside just has a piece of plain Very Vanilla card stock adhered to the base. Measurements and product list can be found after the team member names.

Clicking on the "Next" button will take you to Julie Johnston. If you prefer, you can click on any name below to go directly to that blog. I hope you have time to do so as we have very talented members from both teams participating.

https://wildwingcreations.com/2018/06/21/stampin-up-joint-thursday-blog-hop/


Amy Koenders
Shelagh Freemantle 


Thank you for stopping by and hopping with us.

Measurements:

Card base: 5 1/2" x 8 1/2", scored and folded at 4 1/4"
Mat: 5 1/4" x 4"
Art Panel: 4" x 2 1/2"
Sentiment: 4" x 1/2"

Product List:

Pammie's Inky Pinkies Challenge #2411

Welcome to another PIP Challenge . Here is what I created for it... I just love the background digital from our   awesome sponsor ... This w...